Istio is a powerful service mesh that integrates natively with Kubernetes, I have been using Istio as my service mesh, ingress, and egress gateways on my personal k8s cluster for around 6 months now. It has provided me with almost limitless flexibility with service to service communication and end user routing.
Benefits of Istio:
- Secure pod to pod communications with mTLS
- L7 routing capabilities with subsetting
- Highly configurable
- CRD/Native management
- Observability
- Open Source
How it works
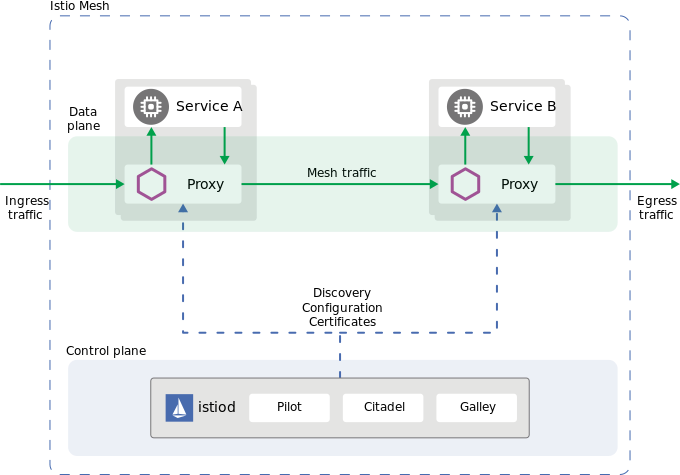
Istio works by injecting a sidecar on to each pod and proxying the request through that sidecar. This allows for a customized registry for all pods and services, custom routing capabilities, and observability for all sidecar injected pods.
The service mesh is split into two main components, a data plane and a control plane.
Data Plane
Istio’s data plane consist of a network of pods running Envoy sidecars. By utilizing sidecars no changes to your k8s deployment methods need to be made. A simple label on the namespace directs the Istio control plane to inject a sidecar and sets you up to utilize all of Istio’s capabilities immediately after install with no configuration changes.
As mentioned above all pod traffic is proxied through the sidecar which allows custom traffic rules to be defined as well as a default suite of metrics to be collected automatically.
Control Plane
The control plane is the heart of Istio, it provides service discovery, configuration and certificate management. The main component of the control plane is Istiod.
The control plane injects Envoy sidecars based on the namespace label istio-injection=enabled via a webhook and then proceeds to configure the pod with your service meshes configuration. The main component of Istiod is Pilot, to go in-depth into pilot and its capabilities you can visit the link I provided.
Installation
Istio can be installed either with the Istioctl binary, helm chart, or via the Istio Operator.
Istio is able to be installed on:
- Native Kubernetes Clusters
- Cloud Kubernetes Clusters
- Multi-Cluster configurations
- Externally Managed Control Planes
- Virtual Machines
Rather summarizing the installation documentation you can click the links above I provided for each install method to get started with Istio. I recommend the demo profile which enables an essentially all of Istio’s features and allows you to try them all out.
Configuration
For Istio to work properly certain labels and ports must be defined in your k8s deployment/service manifests. Here is a link to the Istio documentation for a full list of requirements. I have included the deployment requirements below which is all you need for a vanilla k8s install.
Deployments/Daemonsets/Replicasets/Pods
| apiVersion: apps/v1 | |
| kind: Deployment | |
| metadata: | |
| labels: | |
| app: redis | |
| version: "6.0" | |
| name: redis | |
| namespace: wordpress | |
| spec: | |
| replicas: 1 | |
| selector: | |
| matchLabels: | |
| app: redis | |
| version: "6.0" | |
| template: | |
| metadata: | |
| labels: | |
| app: redis | |
| version: "6.0" | |
| spec: | |
| containers: | |
| - image: redis:6.0 | |
| name: wordpress | |
| ports: | |
| - containerPort: 6379 | |
| name: tcp-redis |
app: This field needs to be set for Istio to know how to associate like services and other resources
version: This field must be set and is used in subsetting (where you can route traffic to specific versions) useful for blue/green or canary deployments
service ports: This is an optional field that lets you explicitly specify protocols, generally you will set this in the service manifest but I like to set it here as well.
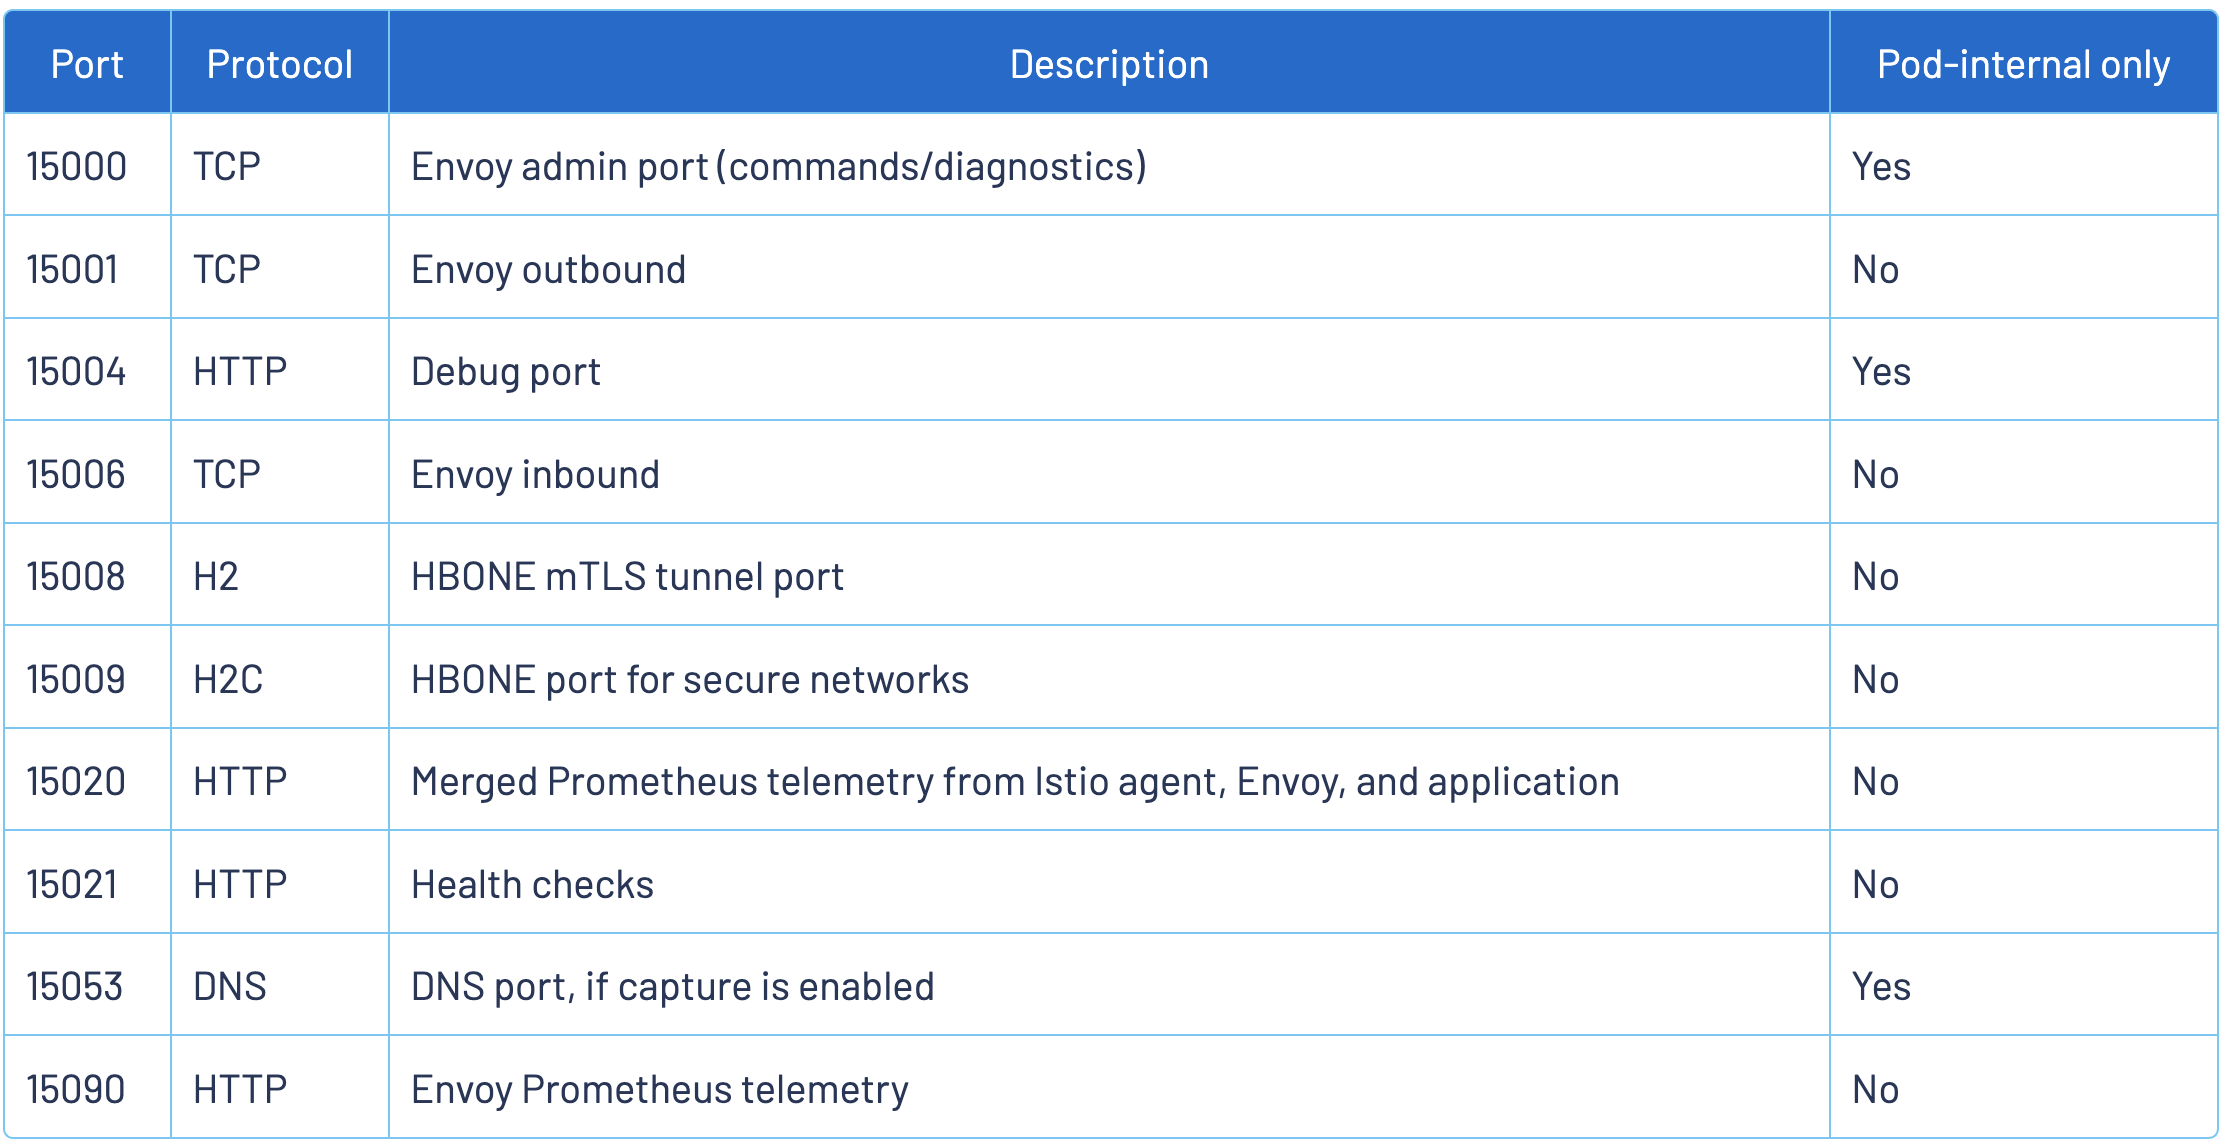
When setting ports for either pods or services, you should refer to the table below and ensure that there are no port conflicts with ports being used by Envoy.
Services
| apiVersion: v1 | |
| kind: Service | |
| metadata: | |
| labels: | |
| app: redis | |
| version: "6.0" | |
| name: redis | |
| namespace: wordpress | |
| spec: | |
| ports: | |
| - name: tcp | |
| port: 6379 | |
| selector: | |
| app: redis | |
| type: ClusterIP |
app: This field should match its associating deployment, Istio uses this to group together deployments and services. You should set this in the labels as well as the selector.
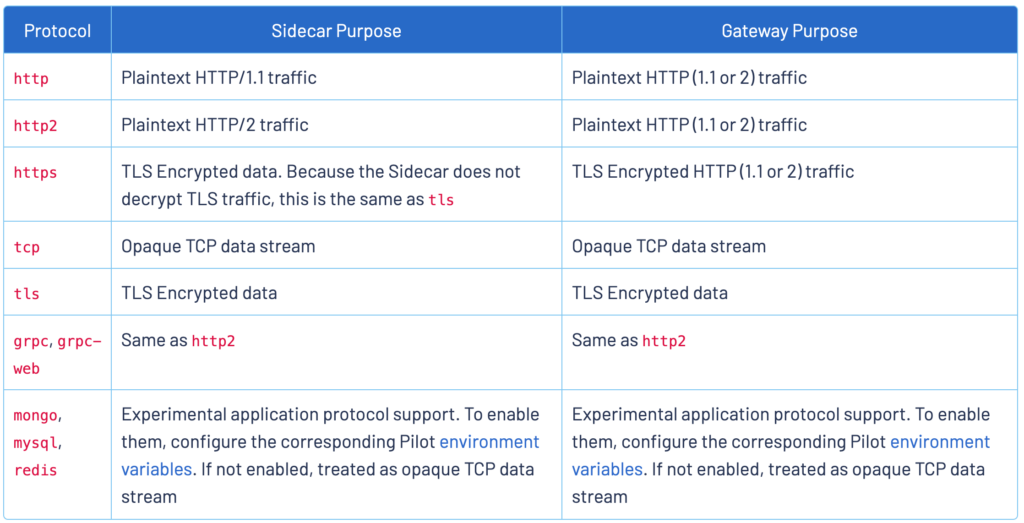
ports: The name for the port needs to be set and prefixed with [protocol]- for Istio’s routing, metrics and mTLS to work. Here is a list of protocols that you can specify, HTTP/HTTP2 are the only protocols can be automatically detected, otherwise if the protocol is not defined the traffic will be treated as plain TCP traffic.
targetPort: If you are unfamiliar with k8s services, a targetPort definition can be used to map ports for the service. For example you have a web server that serves its content on port 8080. If you specify the port: 80 in your service definition and the targetPort: 8080, you would be able to access your web server with the following k8s dns name http://[svc name].[namespace].svc:80. This is effectively maps the service port 80 to the deployment/pod port of 8080.
Use Cases
Instead of just covering each Istio capability I am going to cover common use cases I have used and how to configure them.
Mesh Observability with Kiali and Prometheus
For a in-depth explanation of Kiali, you can visit Istio’s documentation or Kiali’s documentation.
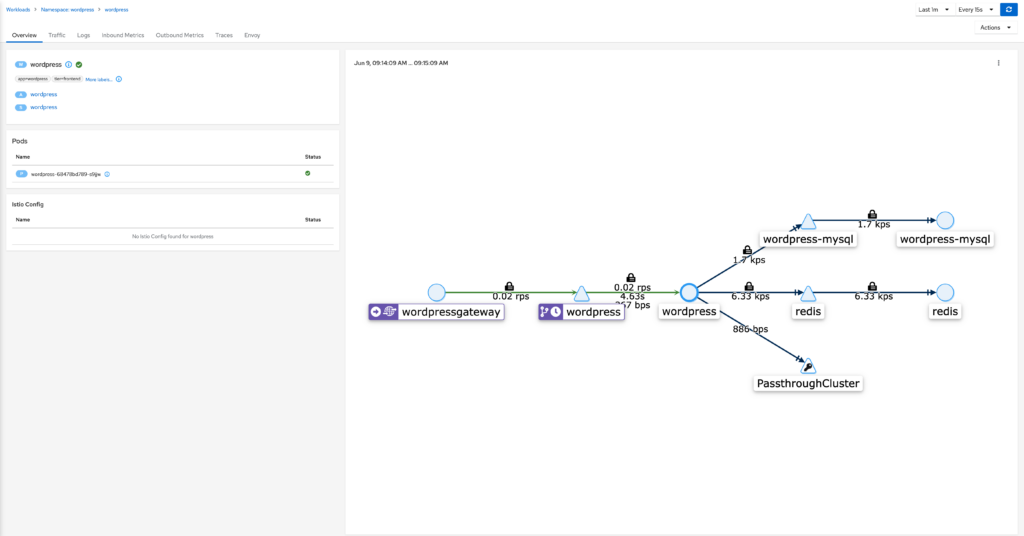
Kiali Dashboard
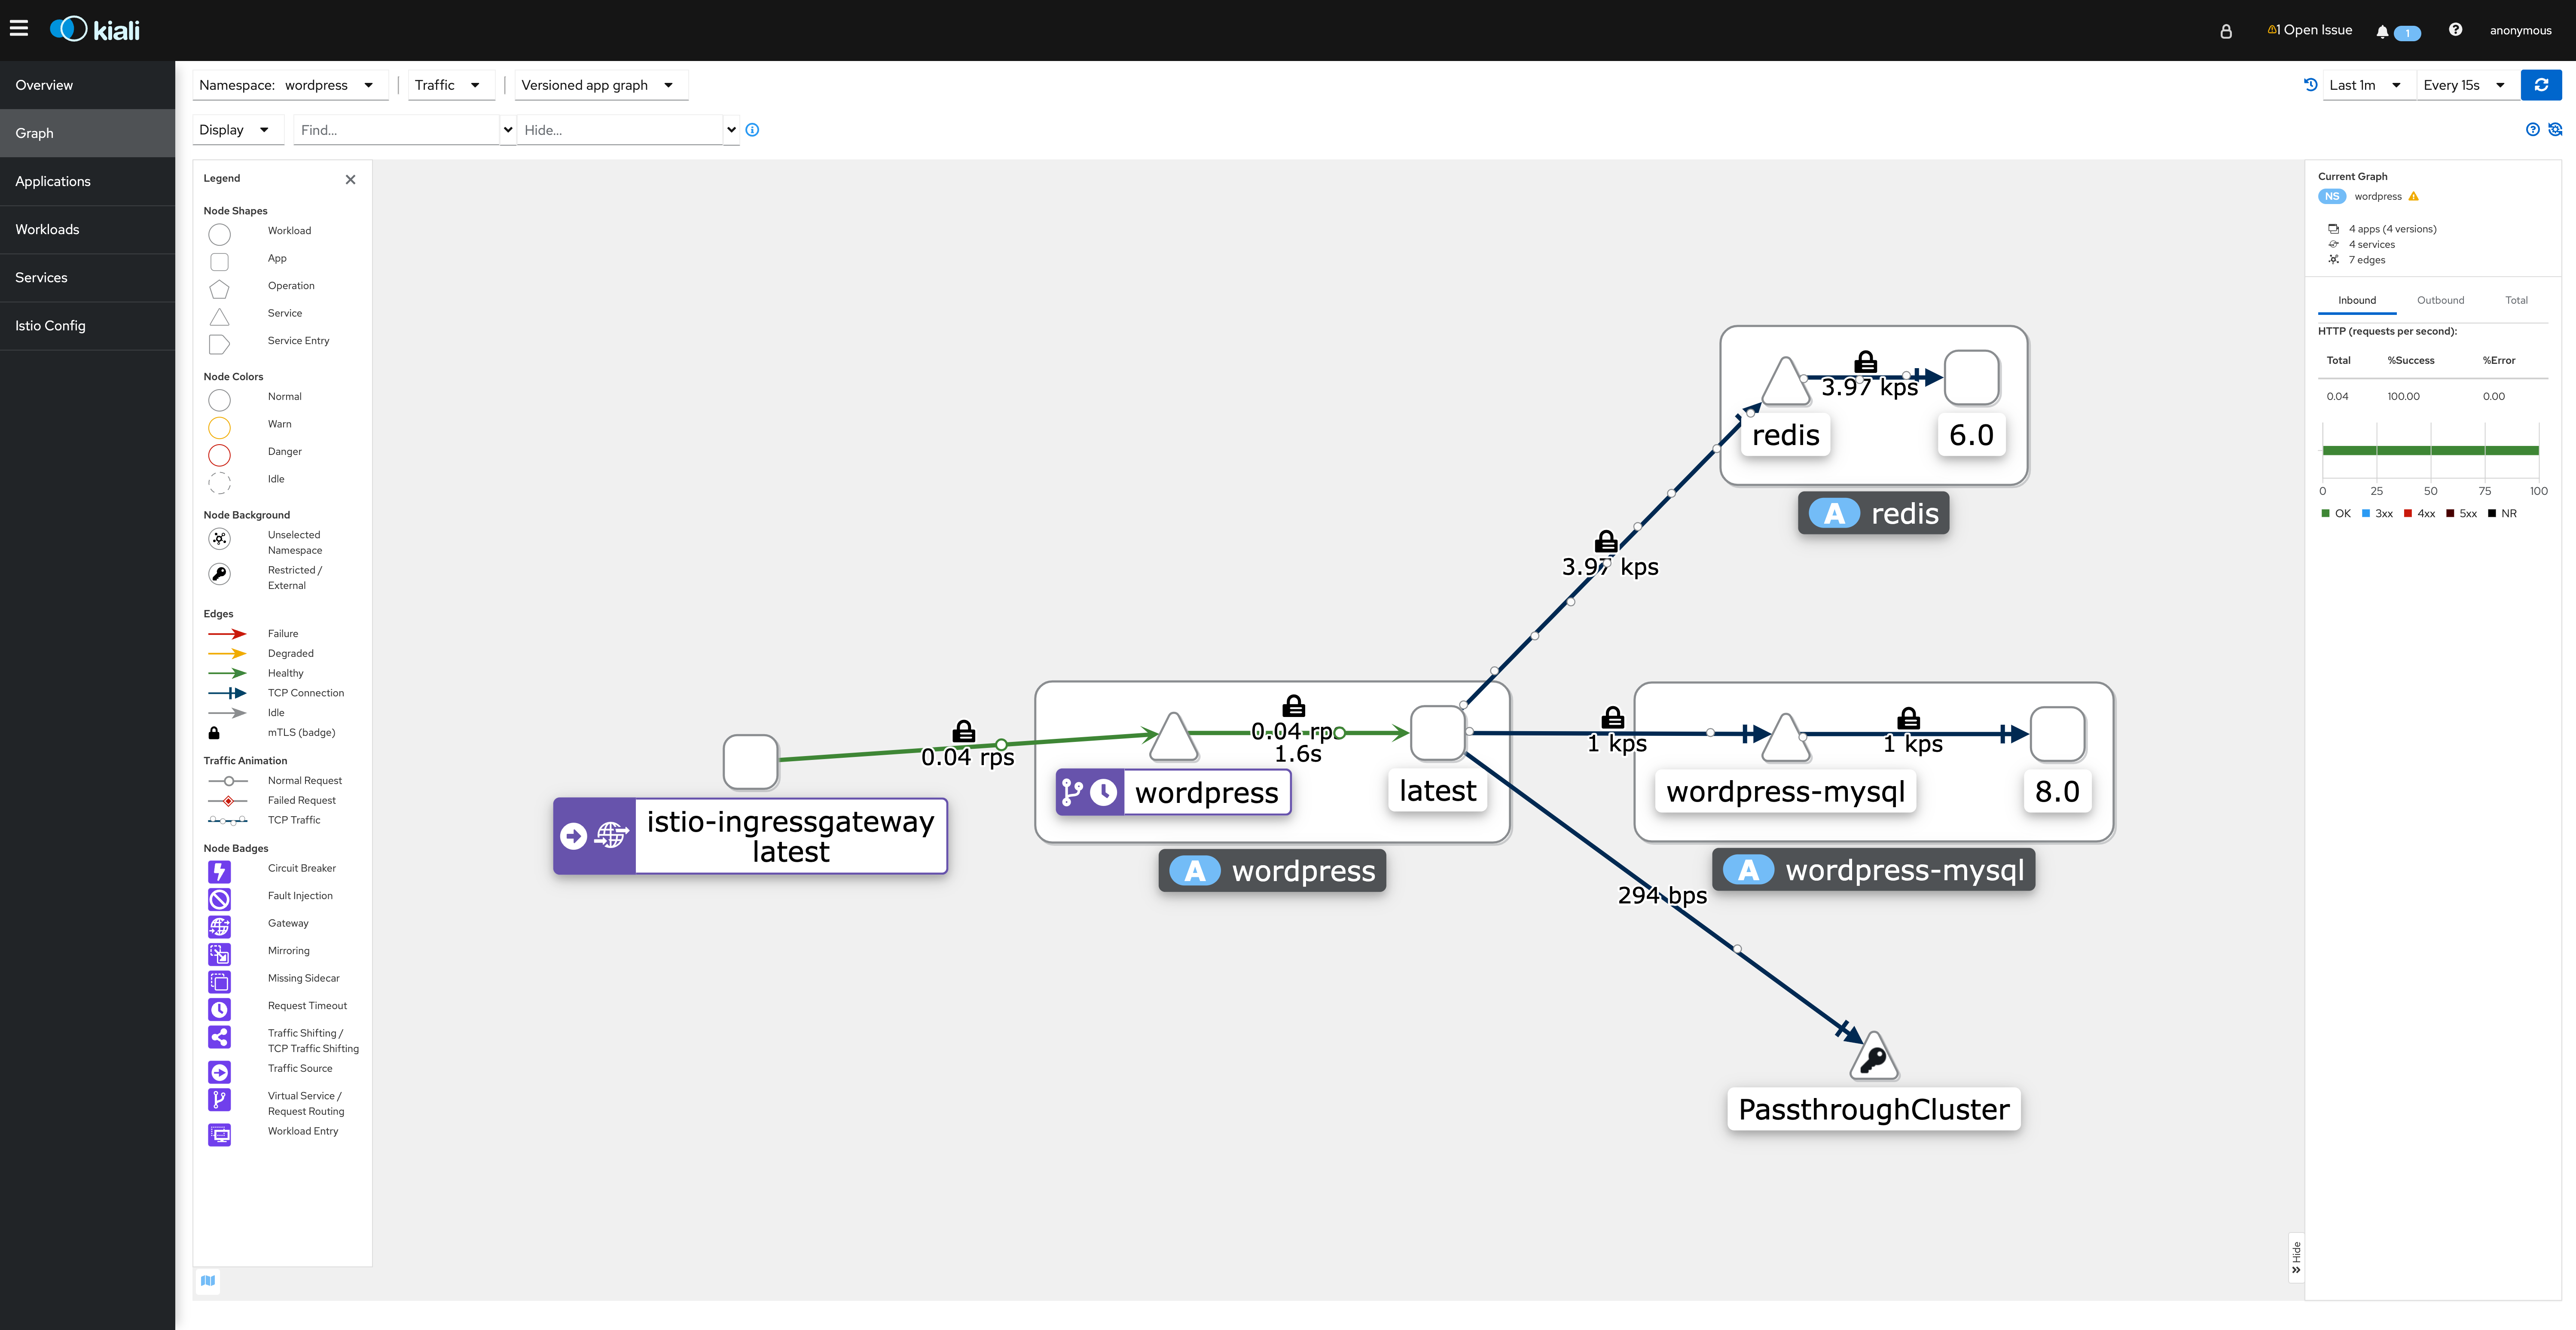
Kiali provides you an extremely detailed observability dashboard and gives you an inside view into your micro-services networking. Above I have included a screenshot of my WordPress namespace, this is where this blog lives. The WordPress deployment actually consist of 3 separate parts, WordPress its self, a MySQL database for the site and redis for object caching.
In the above screenshot you can see a number of key metrics for my namespace including a little lock icon that shows mTLS communications.
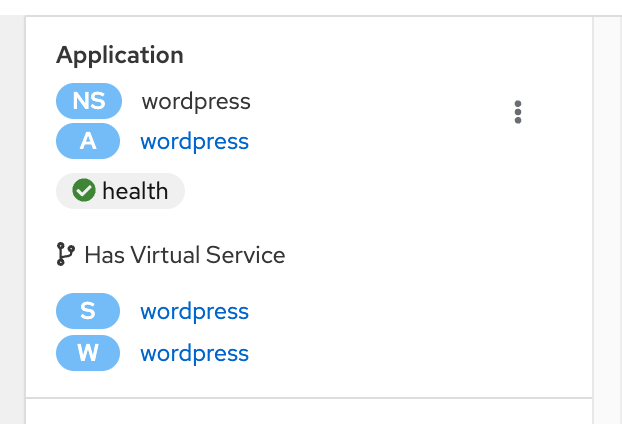
Application Overview
If you click on the app label box a sidebar shows up with all the different components of the selected element.
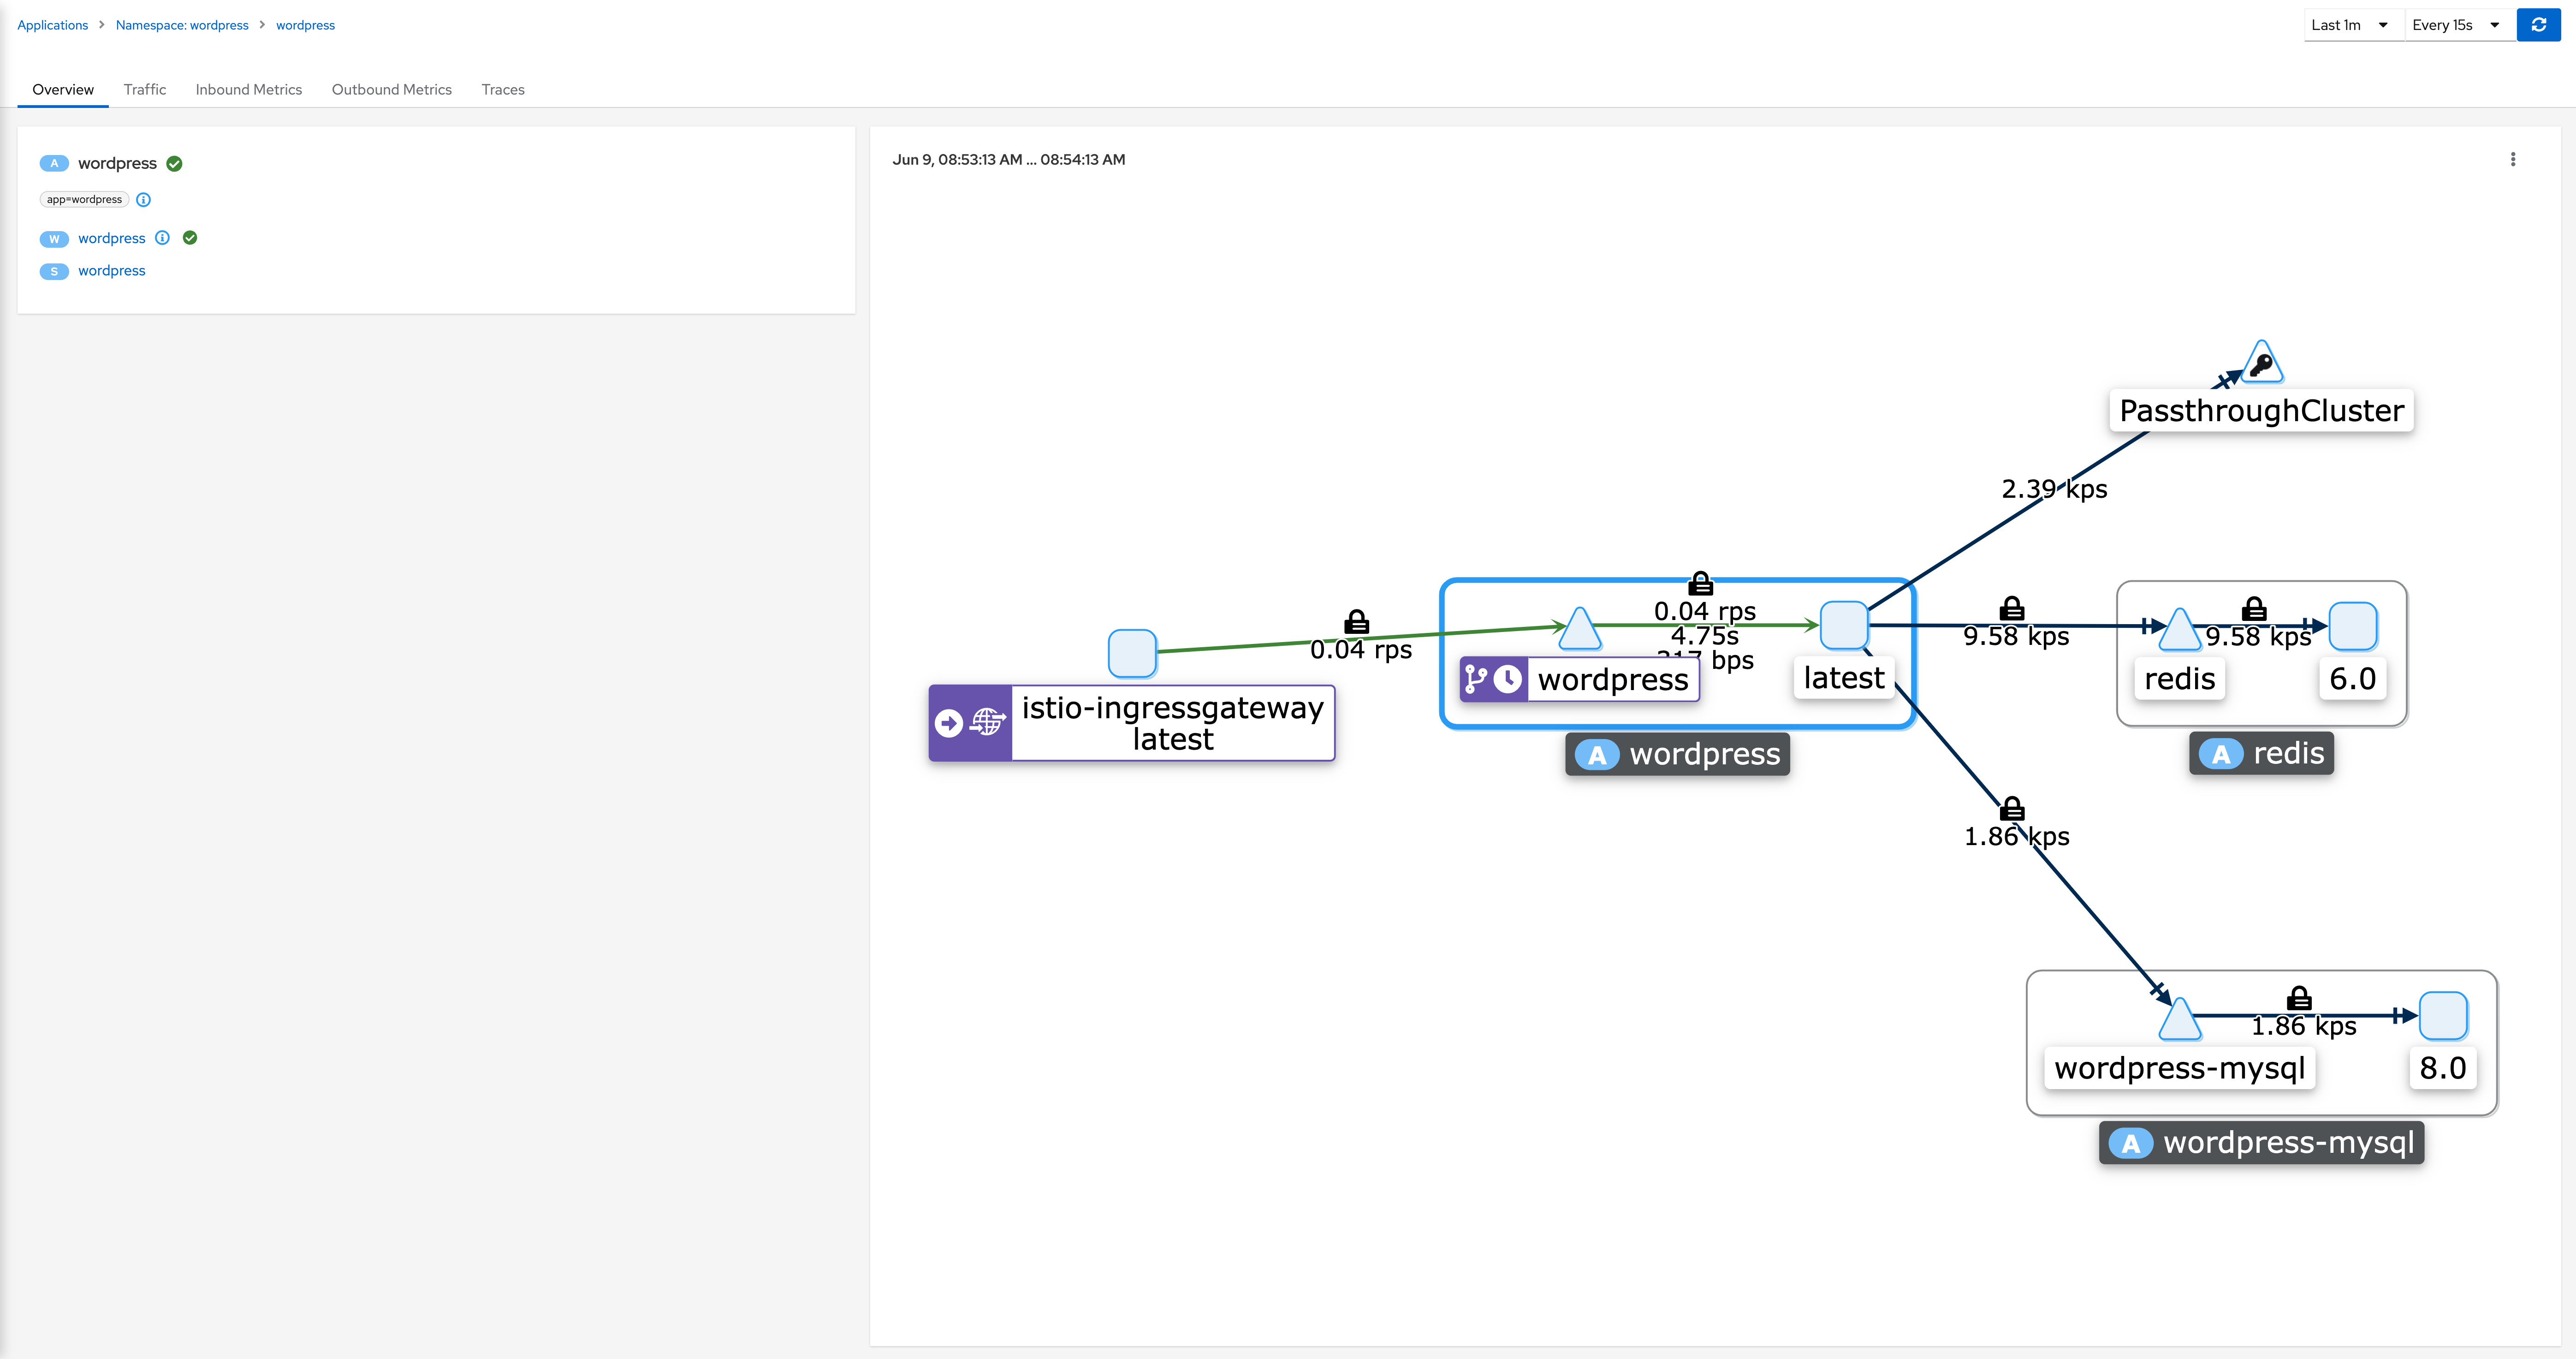
Selecting the the WordPress Application brings you to this page (the application is the link with the label A in front of it). This page gives you several tabs that you can explore for your specific application.
Application Traffic
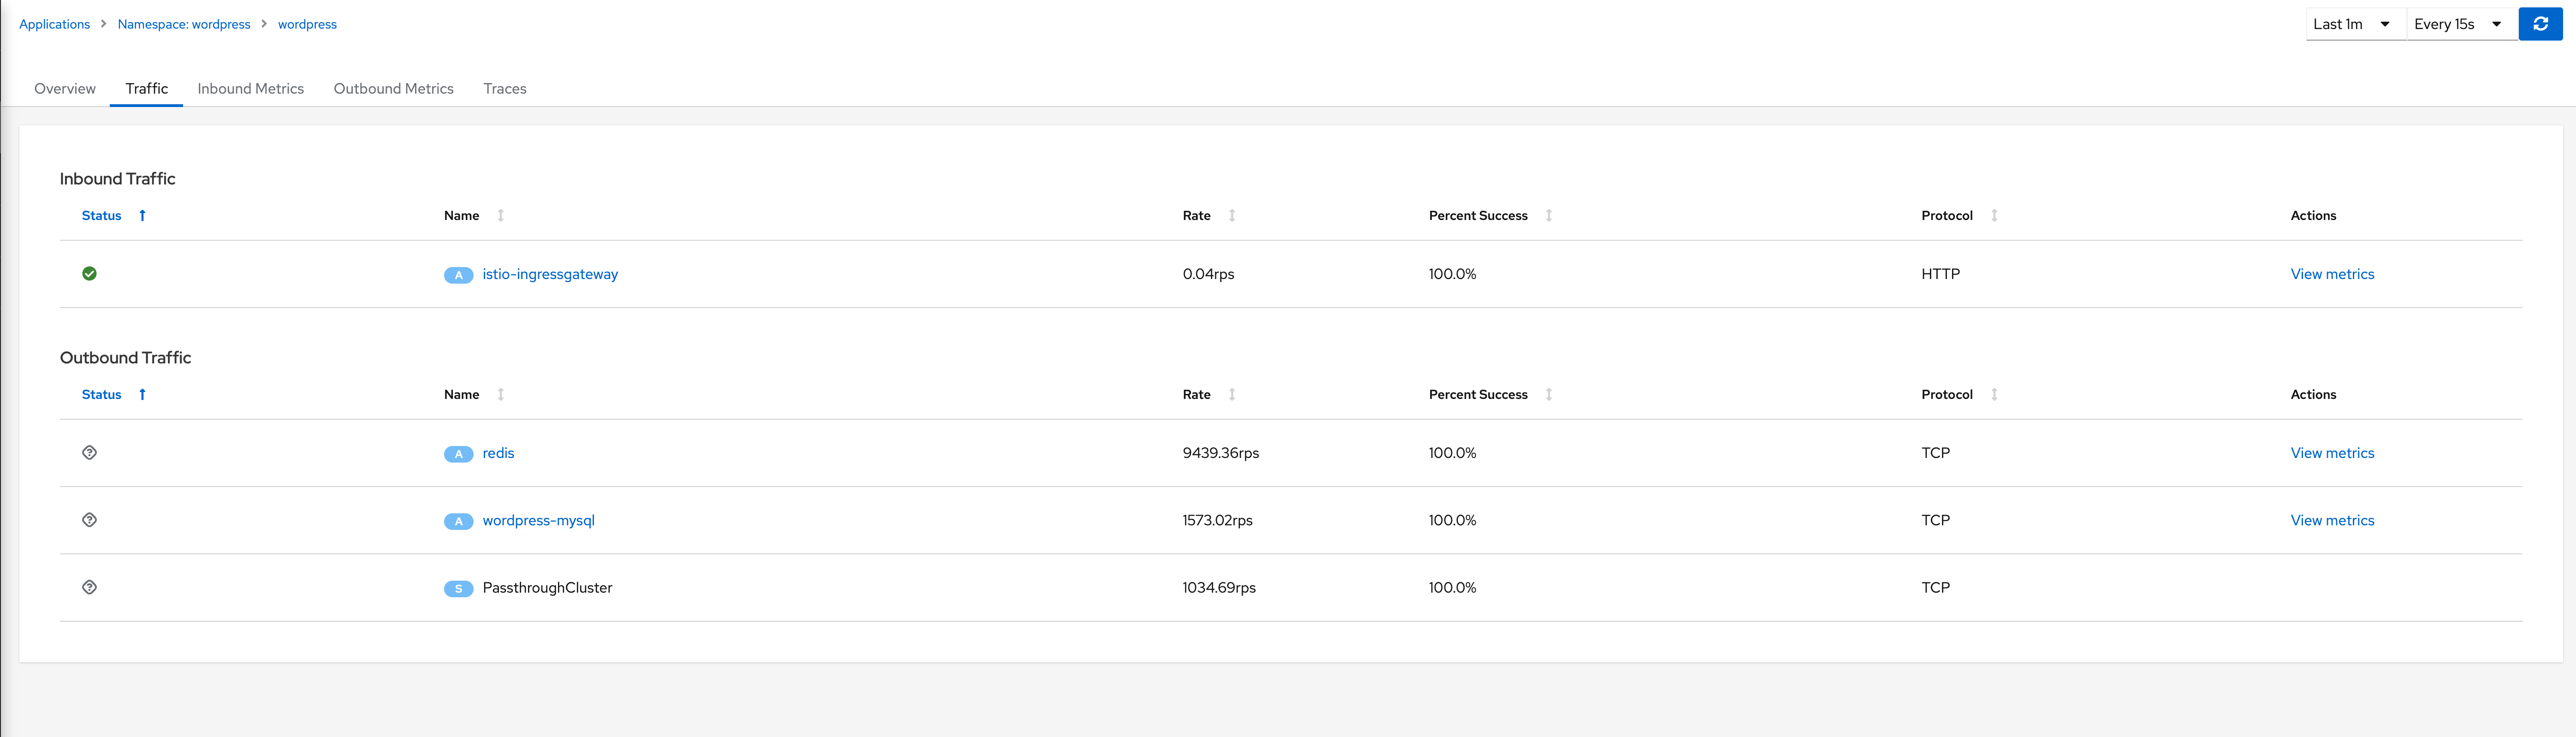
The traffic tab gives you insight into what your application is communicating with, you will see defined entries if it is communicating with something in the service mesh and either Unknown or PassthroughCluster if the communications are with a non meshed application or egresses the cluster respectively.
Inbound and Outbound Metrics
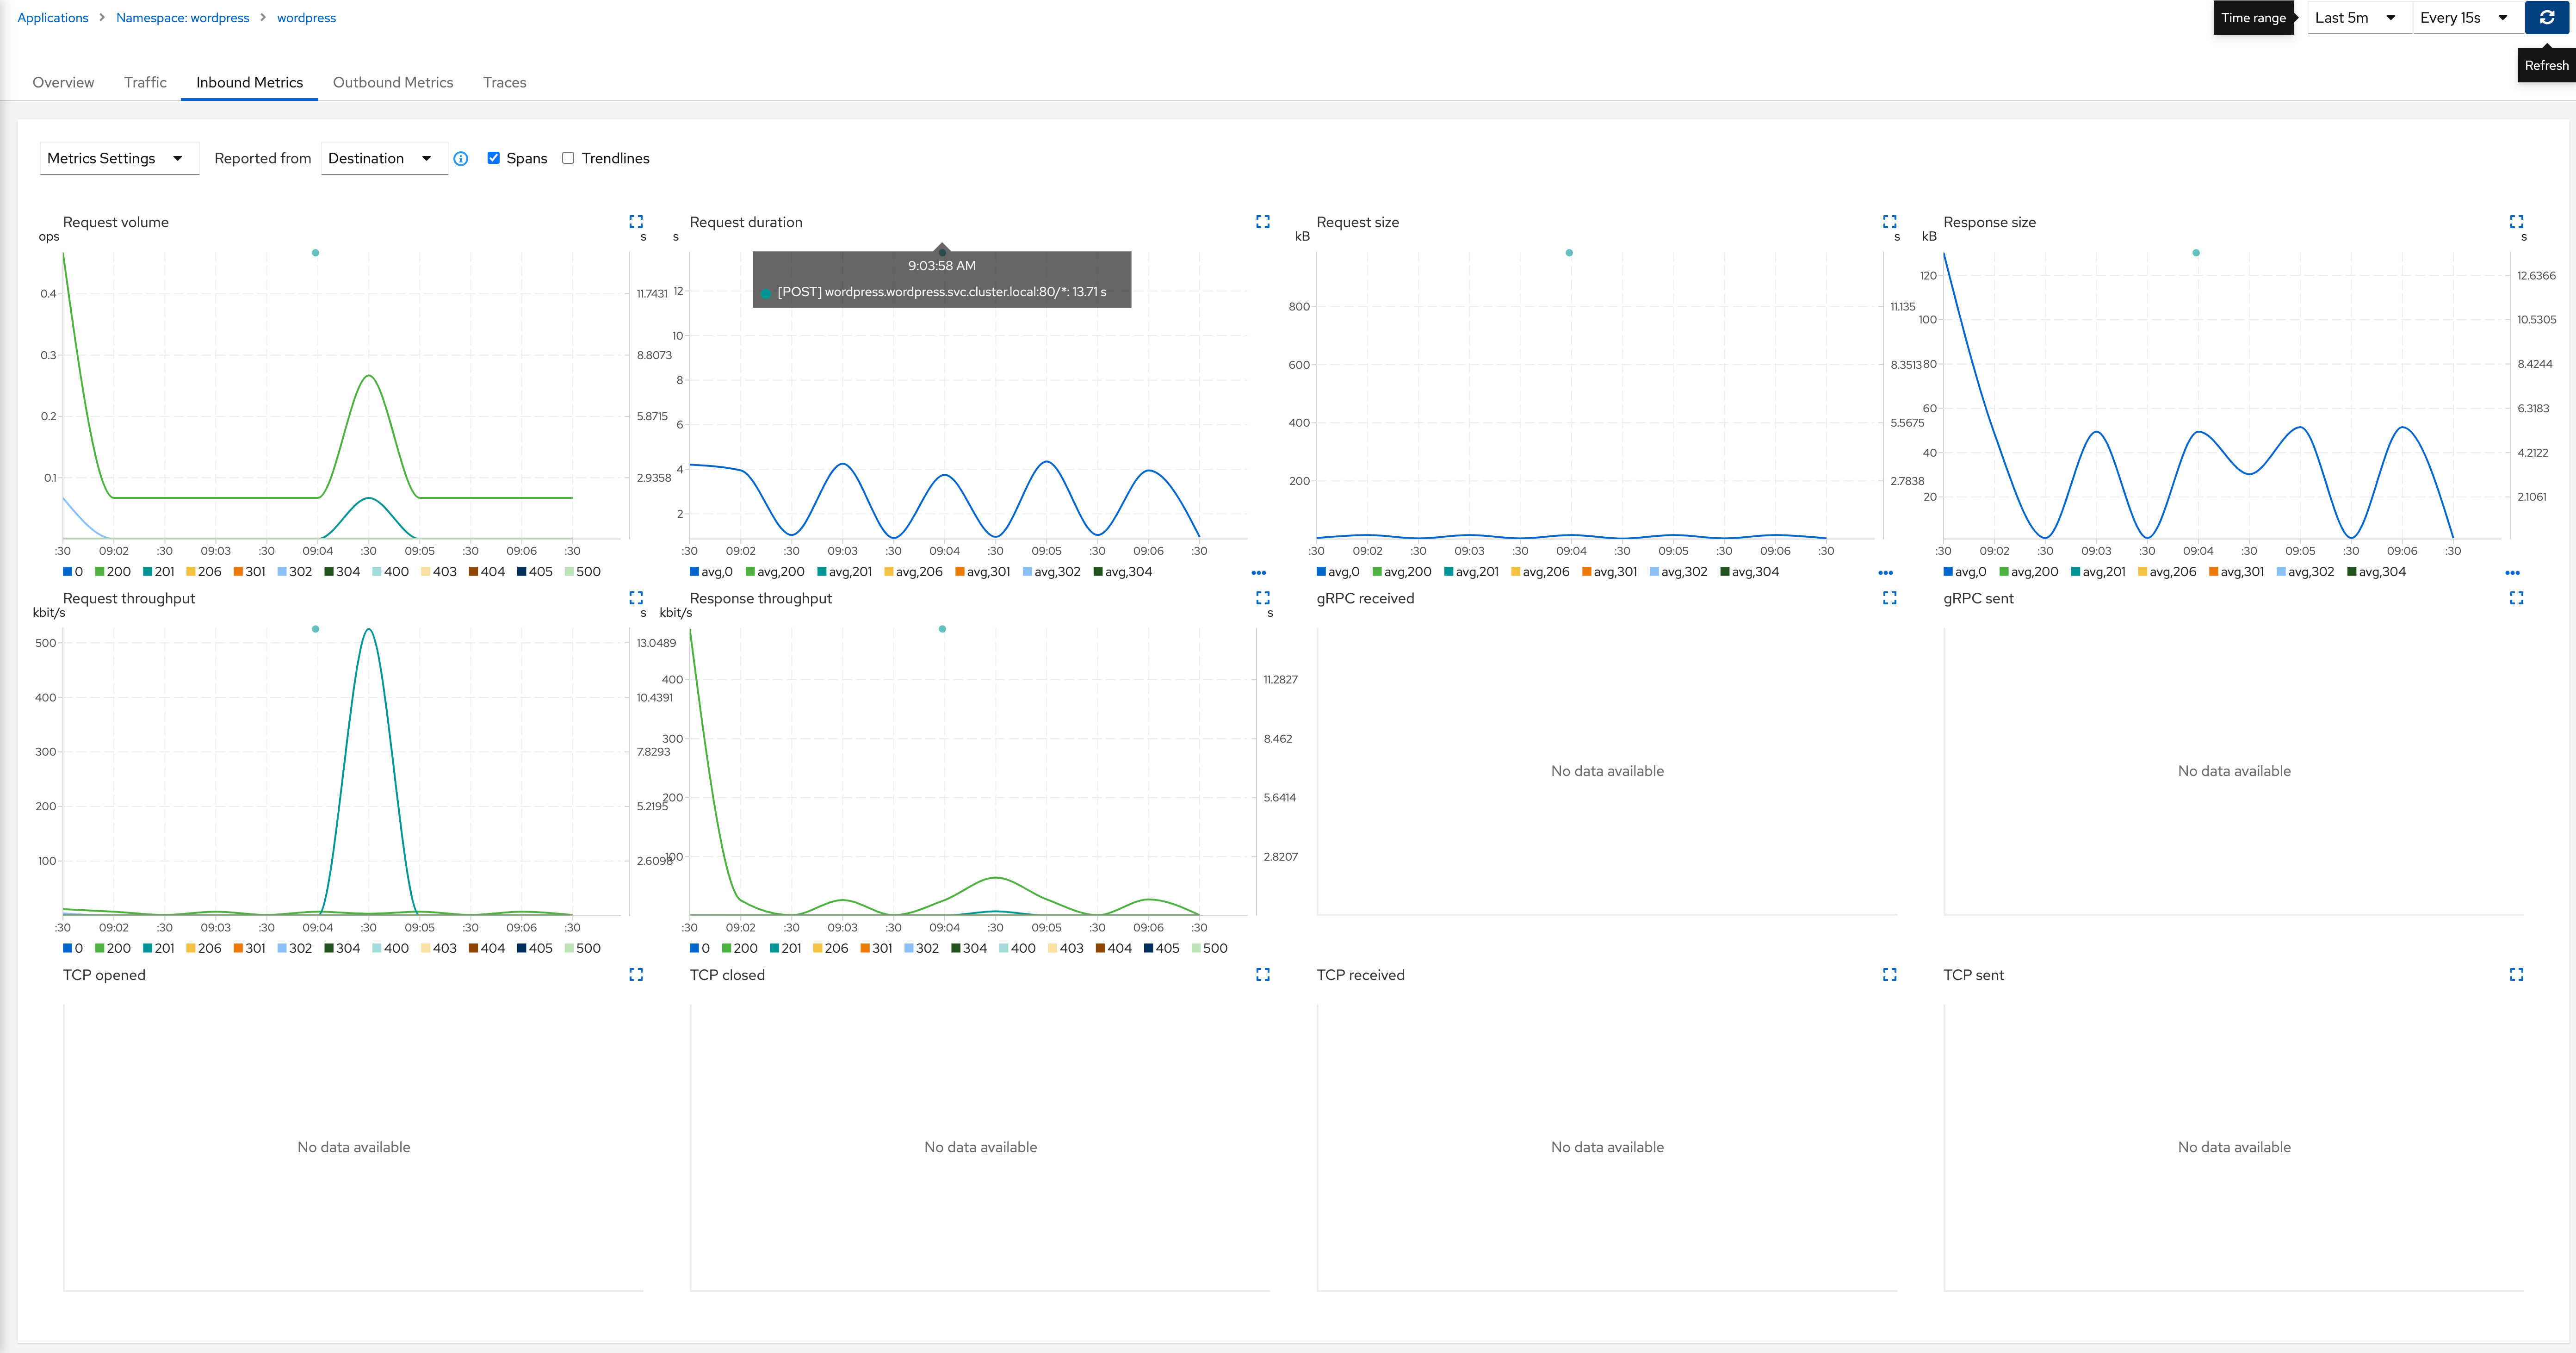
The inbound/outbound metrics gives you insight into your application ingress and egress metrics. This dashboard is fairly detailed and you can change filters and even overlay traces on to the graphs. These metrics are pulled from prometheus.
Traces
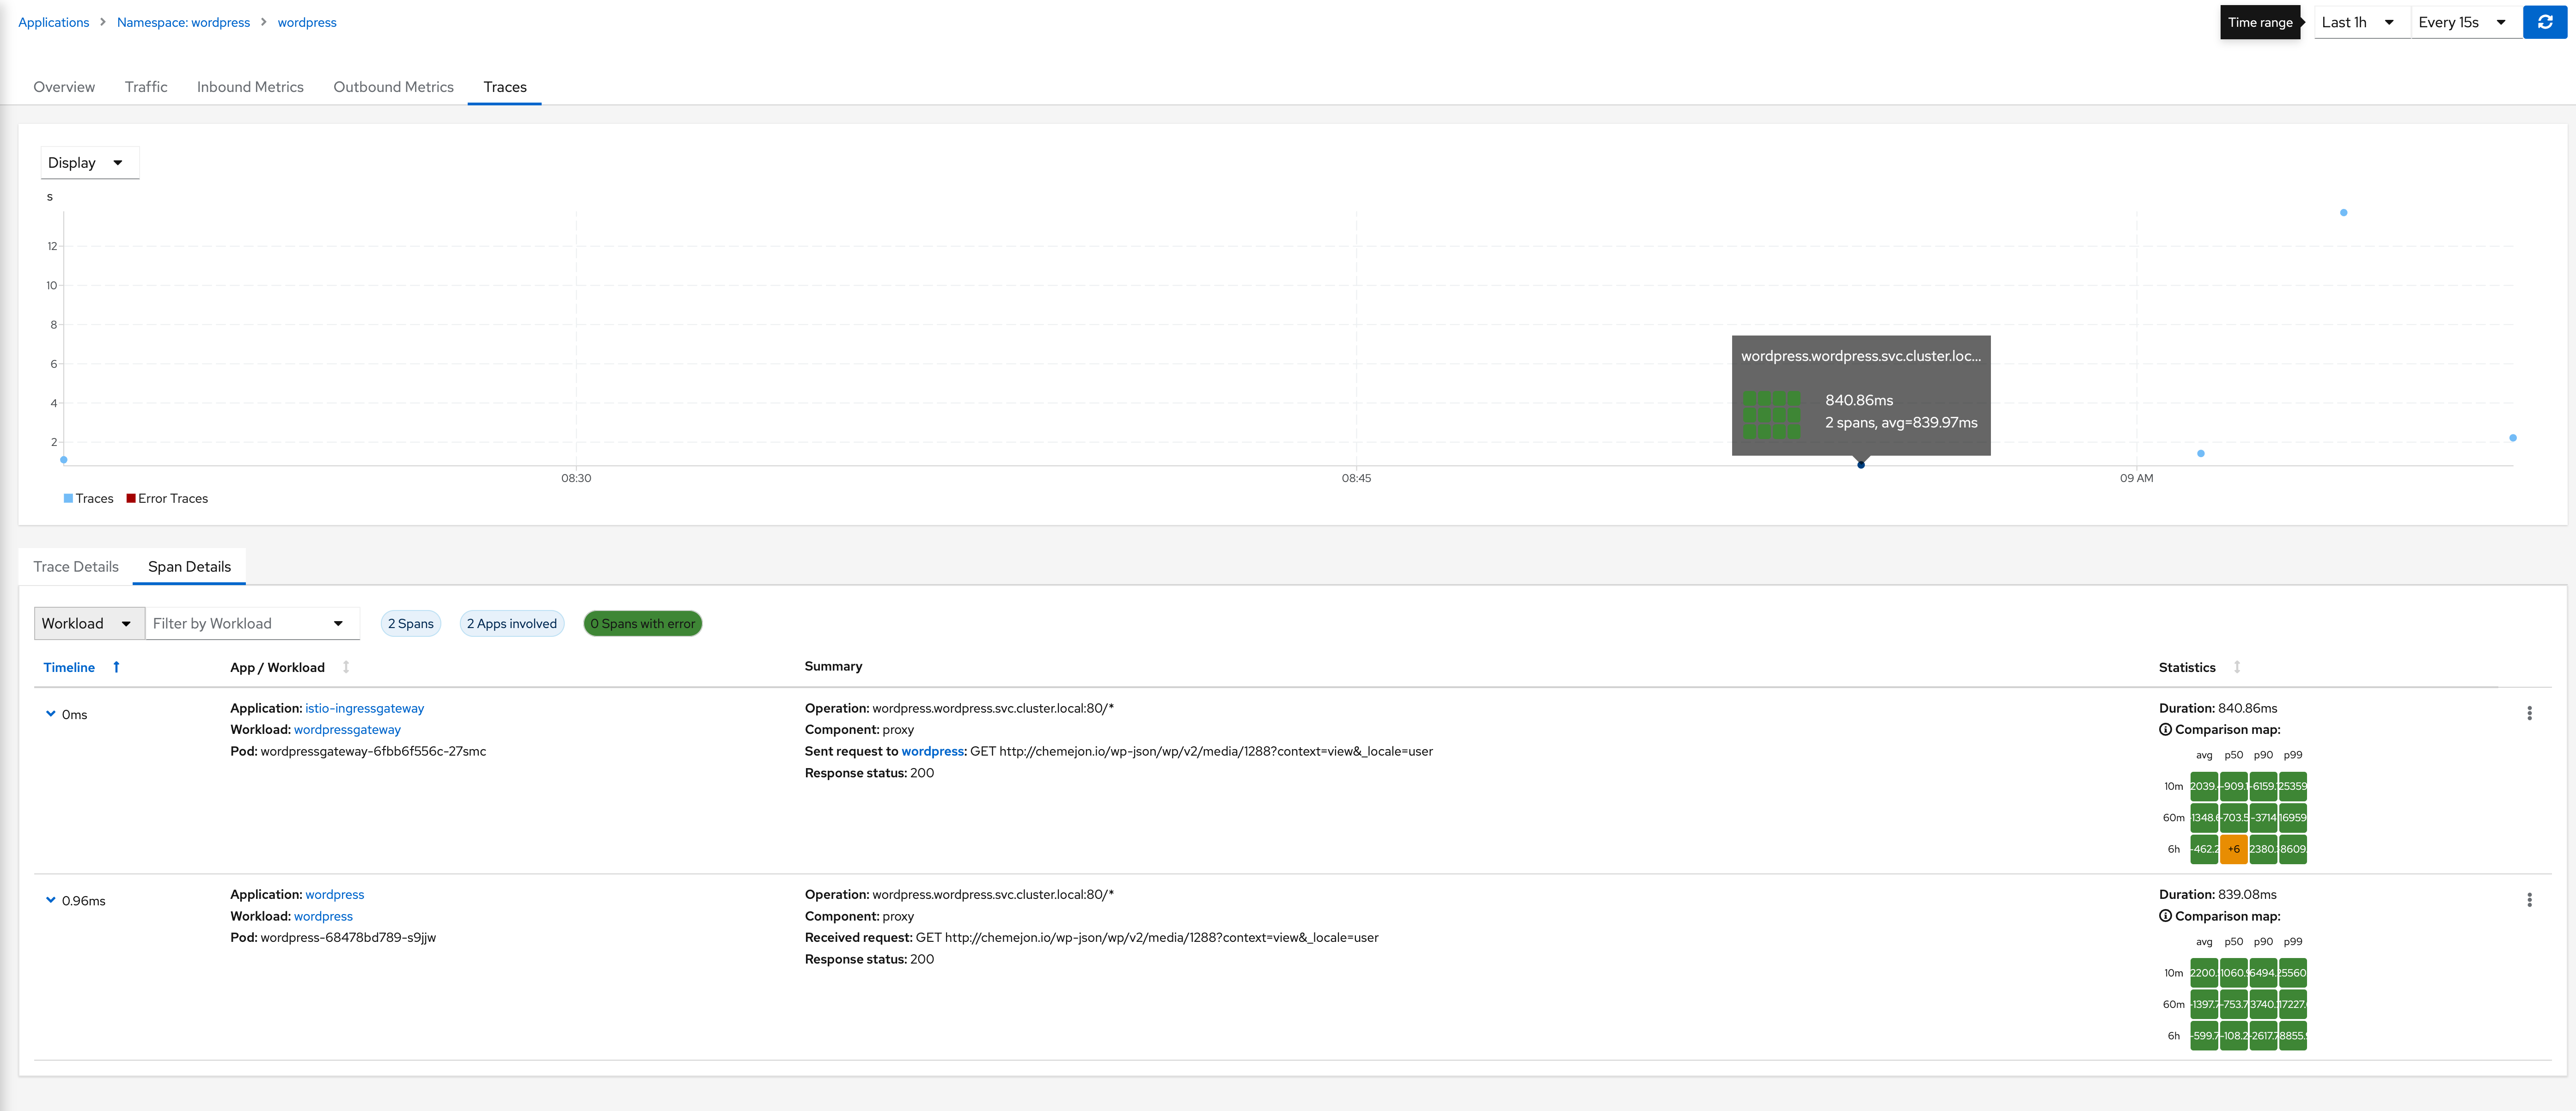
The tracing dashboard provides tracing details from jaeger. This provides insights into request latency, response status, latency and many others.
Workload Page
If you click on the workload component rather then the application component, you will be directed to the workload page which gives much of the same information in terms of networking observability, but now adds tabs for logs and Envoy.
Logs
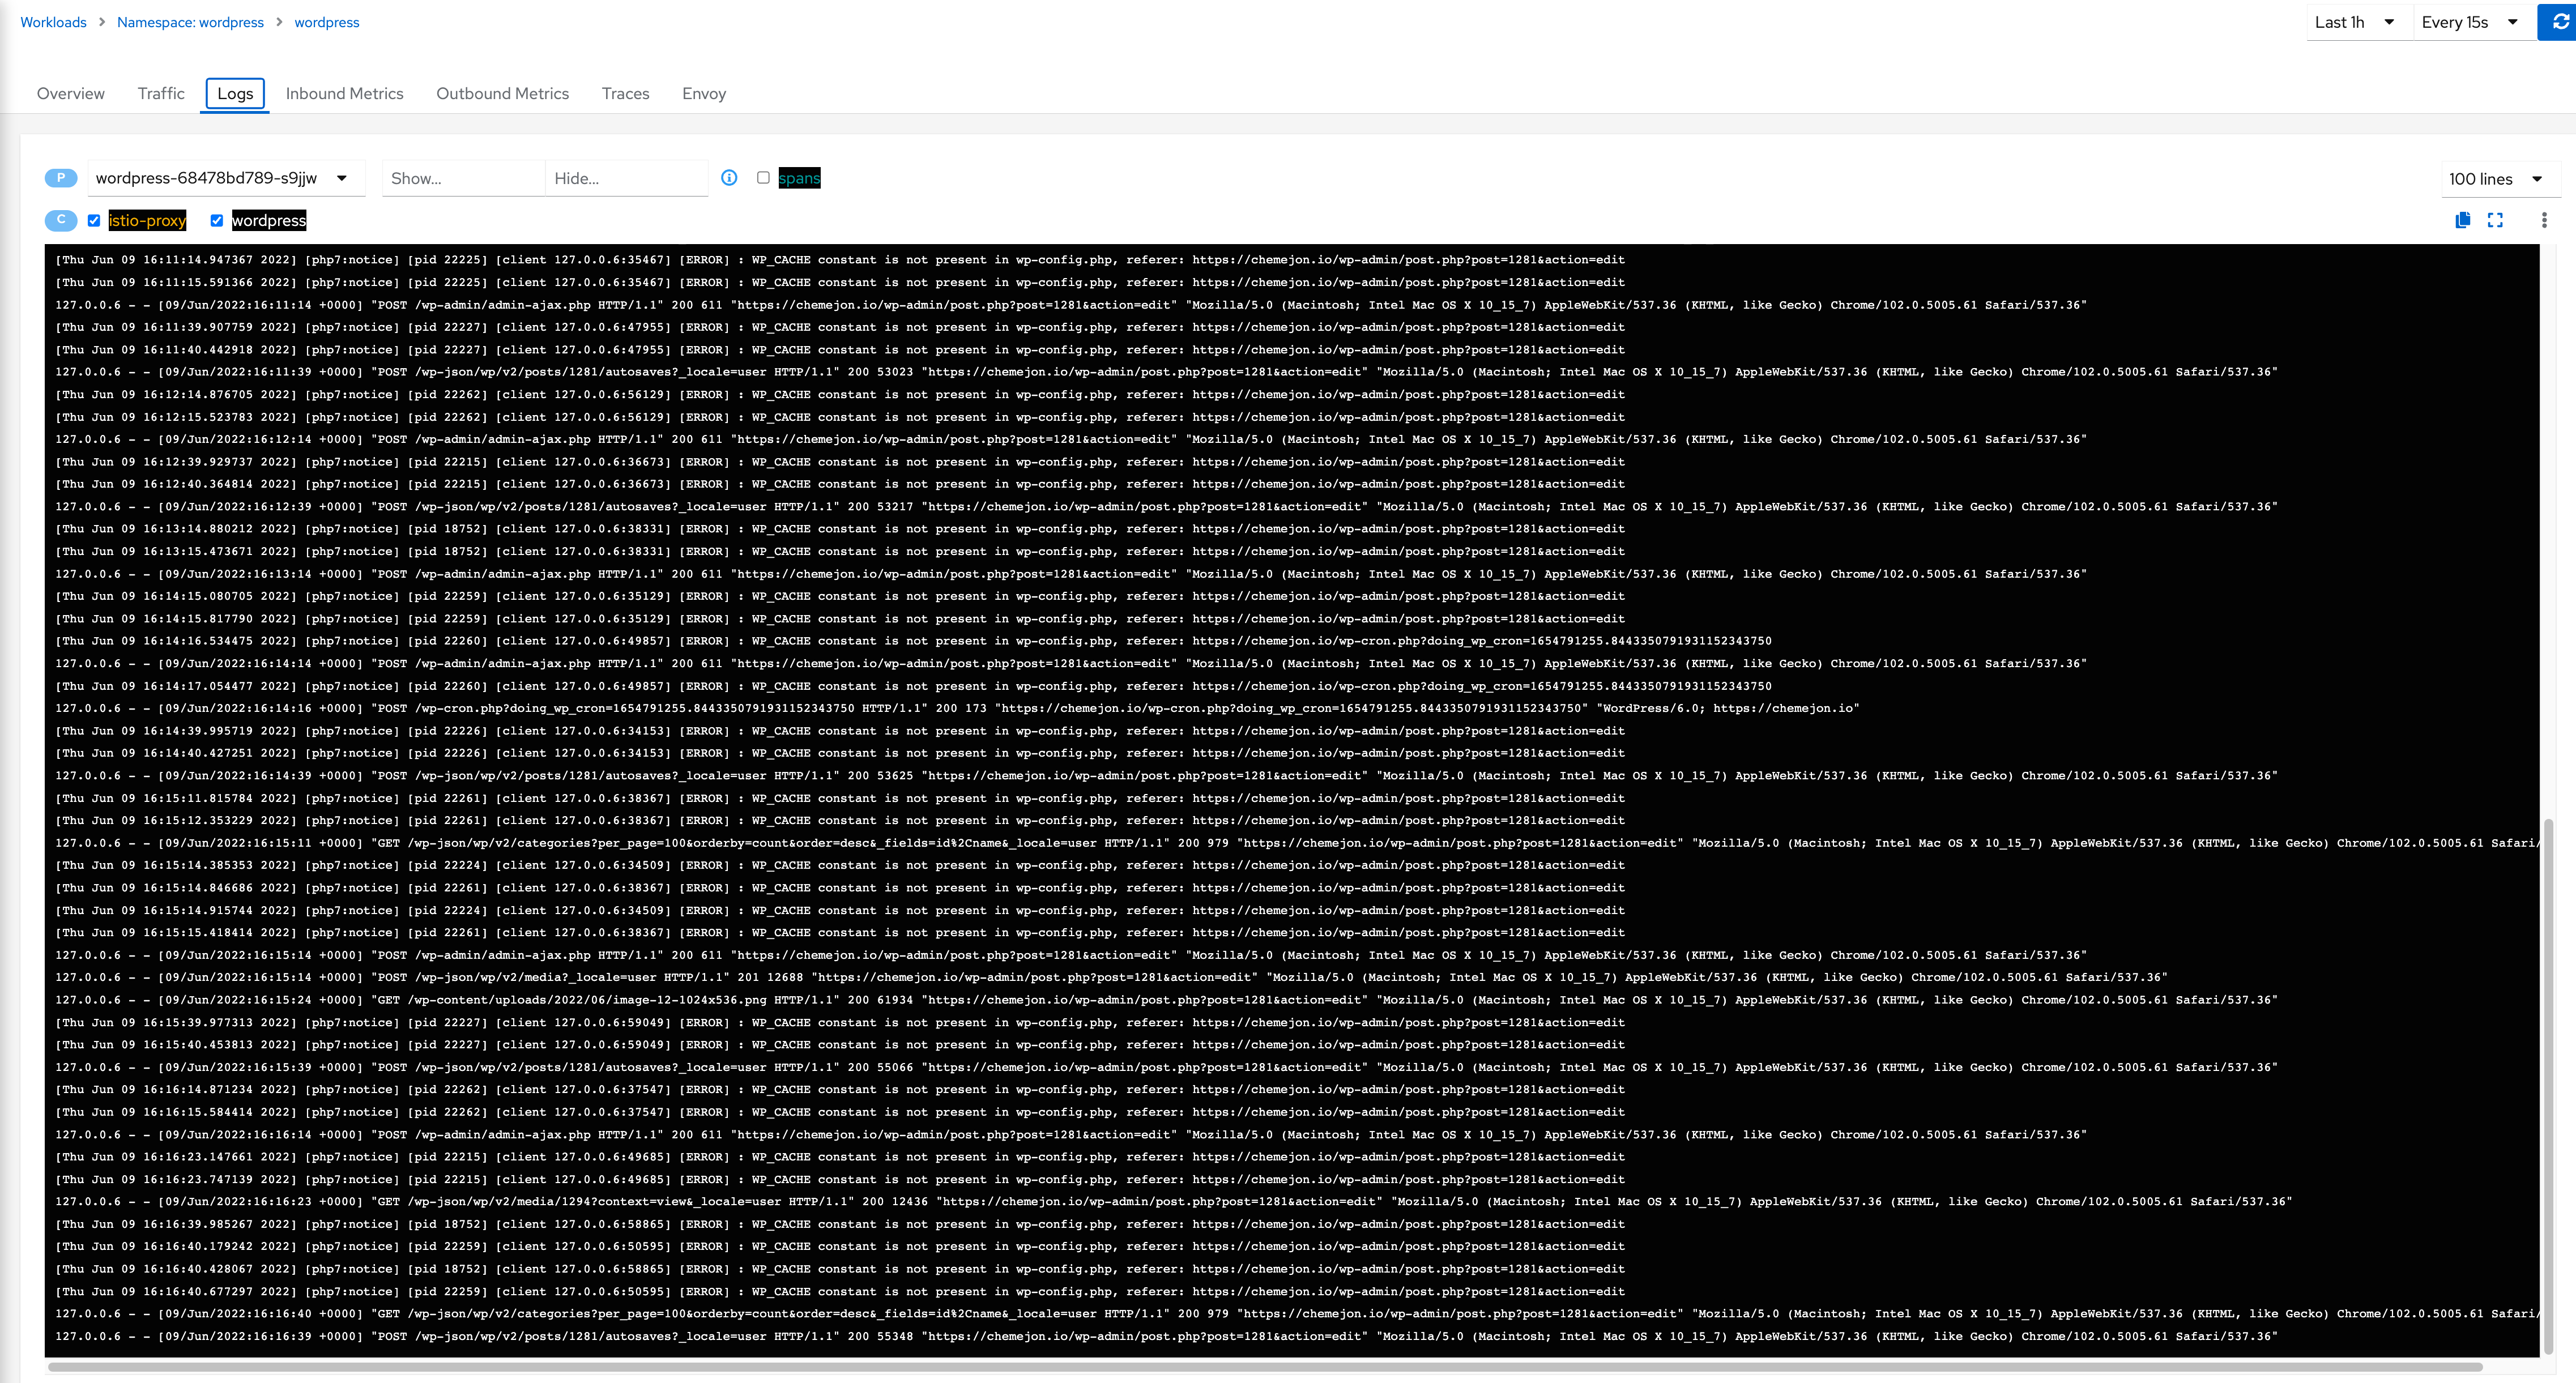
The logging page gives you all logs from the specific deployment, you can even configure what containers are shown. There is also an option to append spans into the logs so you can easily identify the logs that follow a certain request you want to analyze.
Envoy
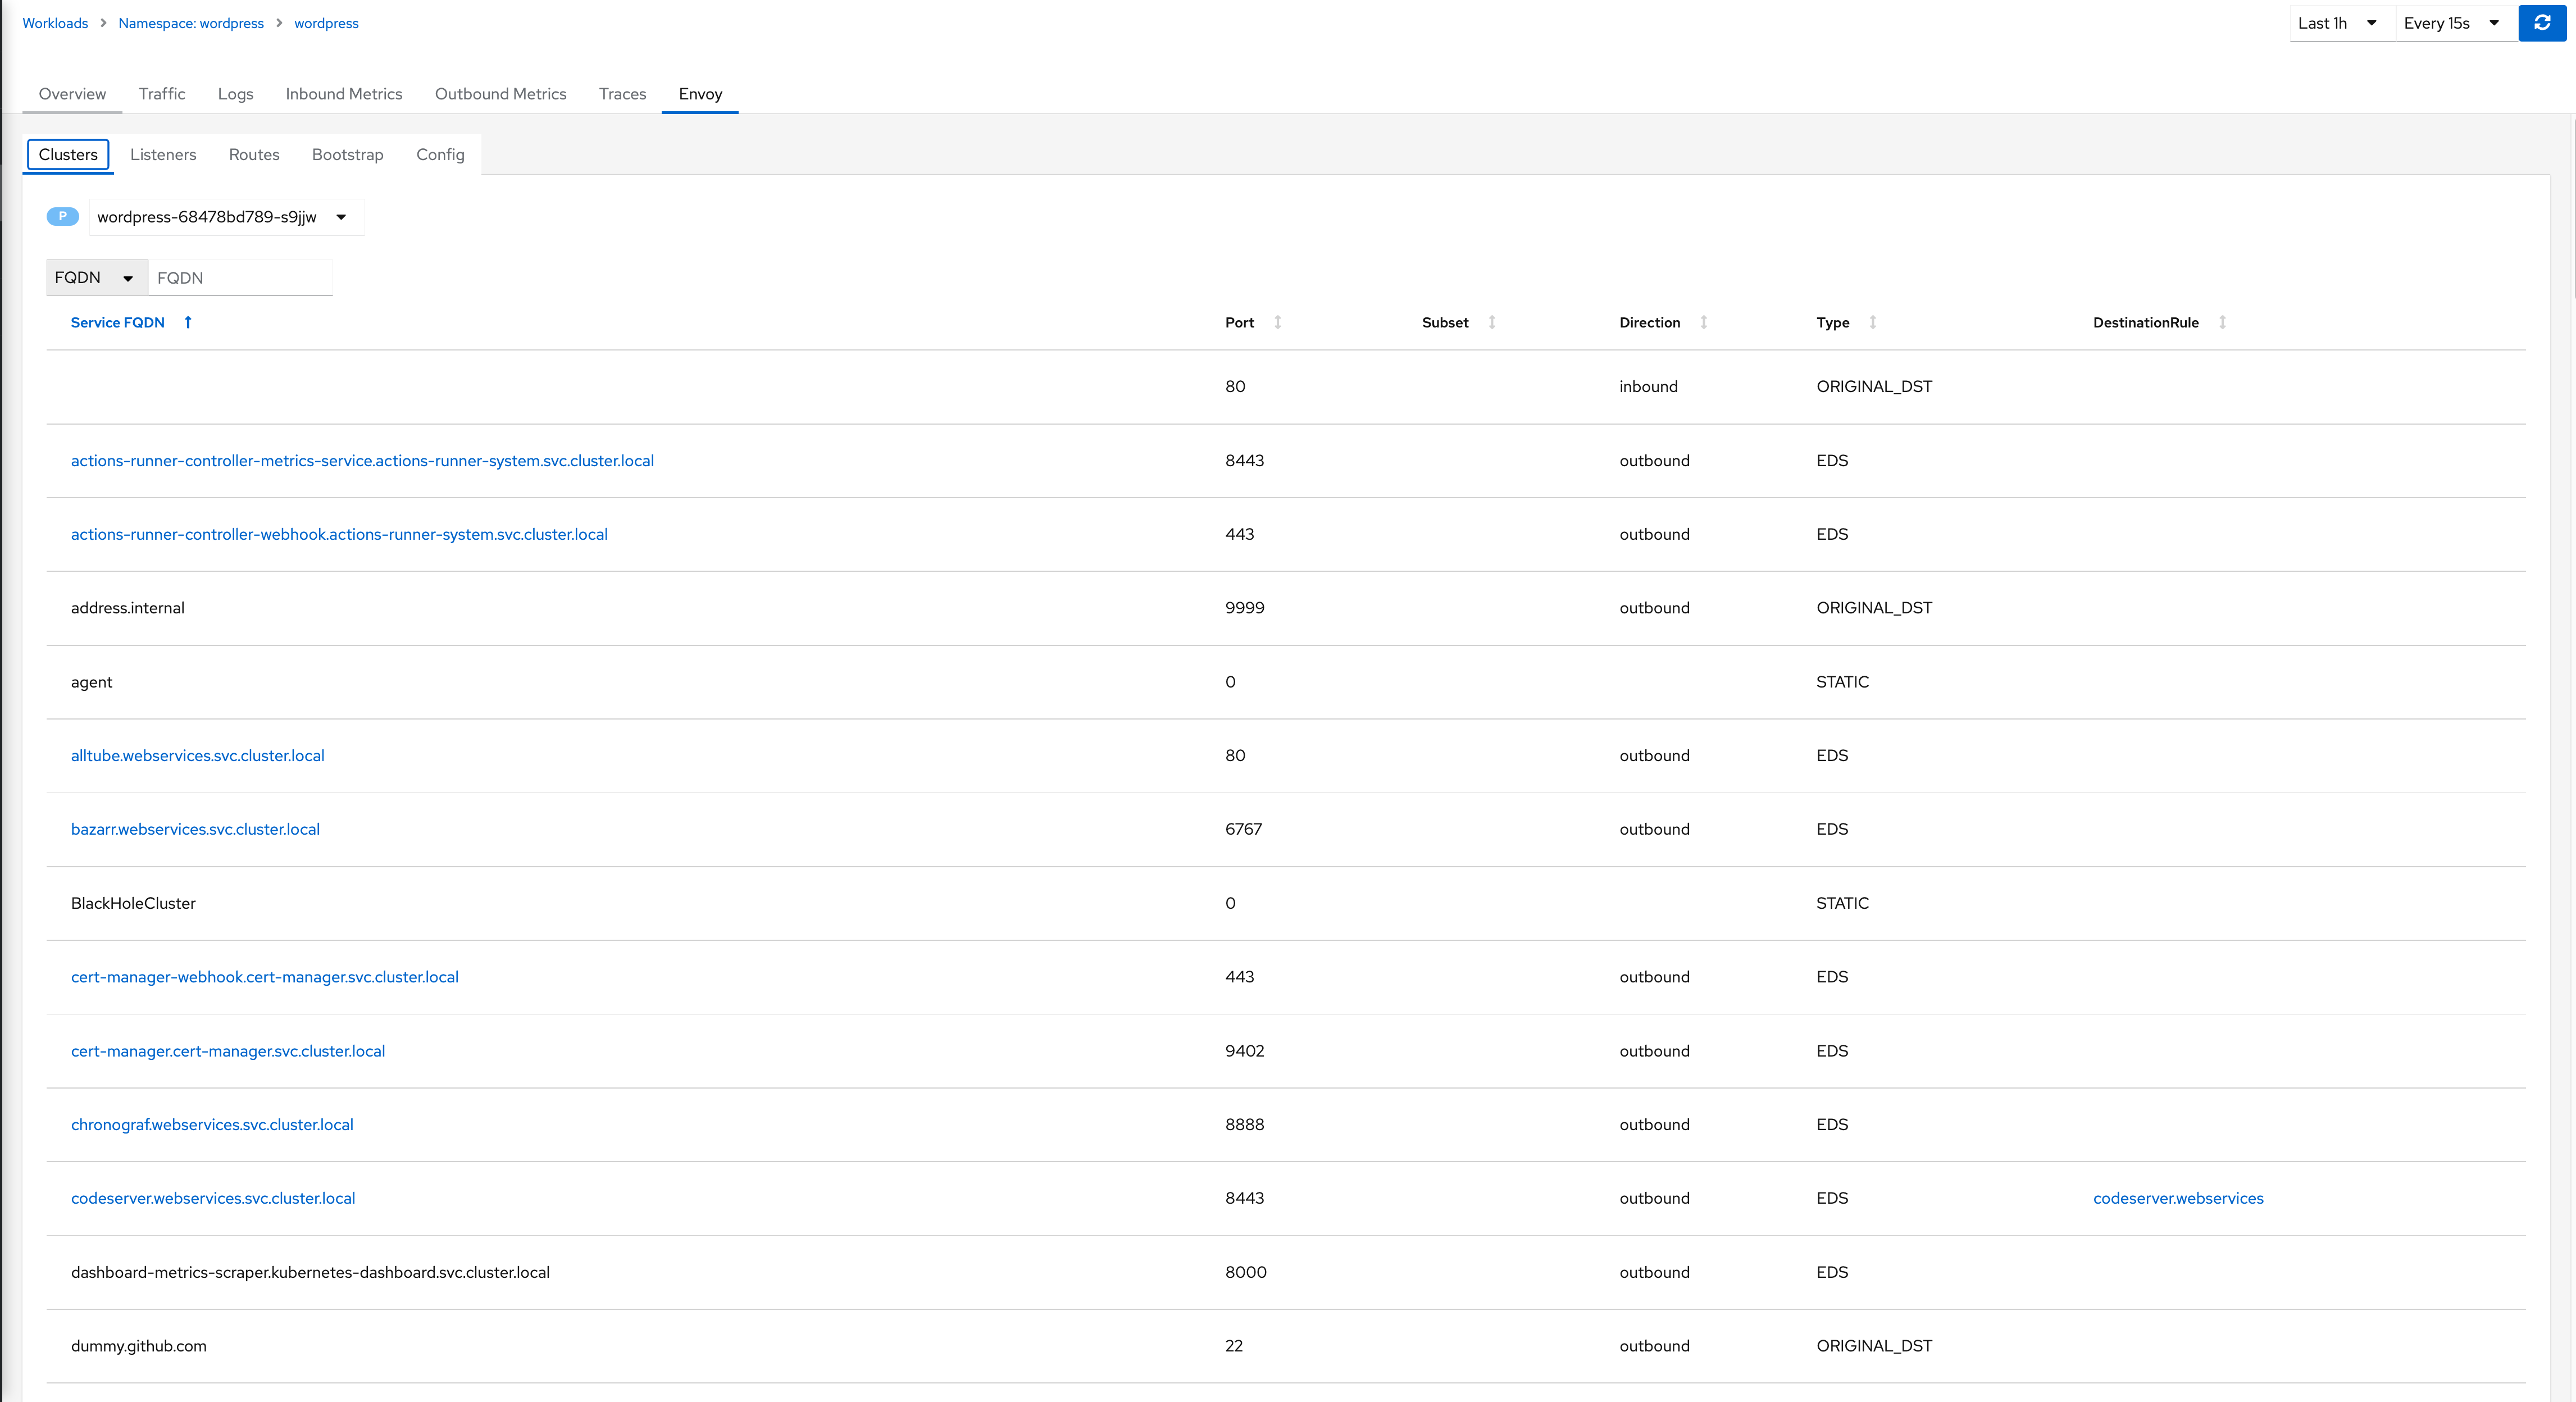
The Envoy tab provides you information on how the Envoy sidecar proxy is configured. There are several sub tabs in this tab. The sub tab in my screenshot is the cluster service tab, this tab shows all the endpoints that the proxy has access to and its respective details. This is useful for troubleshooting if you set a DestinationRule or are trying to connect to a specific subset and want to validate it in the service mesh registry.
Installation and Configuration
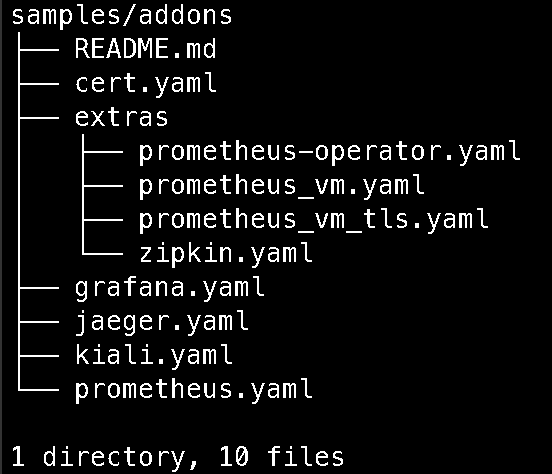
When you download Istioctl, a number of manifests and samples are included. To install everything needed for Kiali you need to apply the following manifests:
- cert.yaml (ingress gateway certificate for your telemetry frontends), this is just a self signed cert that is generated for your domain name. Only needed for remote access of telemetry. I will show you how to generate it below.
- jaeger.yaml the jaeger tracing application that is needed to view traces in Kiali
- prometheus.yaml the prometheus application that scrapes sidecars for metrics, this is needed to view any metric related pages in Kiali
- kiali.yaml the kiali application that provides you the frontend for mesh observability
Remote Access and Certificate Generation
To be able to access Kiali without port forwarding or using NodePort we will be utalizing the IstioIngressGateway installed with Istio and use that with Gateway and VirtualService resources to set up the ingress. This is based off of Istio’s documentation found here.
Generate Certificates
This is only necessary if you want to access the telemetry apps over HTTPS, if you want to just use HTTP you can refer the HTTP section of the document I linked above.
Since I am only using this internally I will not be linking this to a domain and will utilize nip.io a simple wildcard DNS for IP addresses.
Since this is a on-prem k8s install there is no cloud native load balancer, so I deployed one out using a metalLB in L2 mode. I will post a guide on this in the future. But to use this method a load balancer is required.
# Grabs the LB IP of your Ingress Gateway
export INGRESS_HOST=$(kubectl -n istio-system get service istio-ingressgateway -o jsonpath='{.status.loadBalancer.ingress[0].ip}')

# Sets your Ingress Domain to the nip.io wildcard domain for you Gateway IP
export INGRESS_DOMAIN=${INGRESS_HOST}.nip.io

# Sets cert file output directory
CERT_DIR=samples/addons

# Generates ca cert
openssl req -x509 -sha256 -nodes -days 365 -newkey rsa:2048 -subj "/O=example Inc./CN=*.${INGRESS_DOMAIN}" -keyout ${CERT_DIR}/ca.key -out {CERT_DIR}/ca.crt

# Generates tls key
openssl req -out ${CERT_DIR}/cert.csr -newkey rsa:2048 -nodes -keyout ${CERT_DIR}/tls.key -subj "/CN=*.${INGRESS_DOMAIN}/O=example organization"

# Generates tls cert
openssl x509 -req -sha256 -days 365 -CA ${CERT_DIR}/ca.crt -CAkey ${CERT_DIR}/ca.key -set_serial 0 -in ${CERT_DIR}/cert.csr -out ${CERT_DIR}/tls.crt

# Creates k8s secret with cert, I chose to output the yaml to cert.yaml
kubectl create -n istio-system secret tls telemetry-gw-cert --key=${CERT_DIR}/tls.key --cert=${CERT_DIR}/tls.crt
Next you will need to create a Gateway and VirtualService resource to expose Kiali, you can also do this with the other telemetry applications as well.
$ cat <<EOF | kubectl apply -f -
apiVersion: networking.istio.io/v1alpha3
kind: Gateway
metadata:
  name: kiali-gateway
  namespace: istio-system
spec:
  selector:
    istio: ingressgateway
  servers:
  - port:
      number: 443
      name: https-kiali
      protocol: HTTPS
    tls:
      mode: SIMPLE
      credentialName: telemetry-gw-cert
    hosts:
    - "kiali.${INGRESS_DOMAIN}"
---
apiVersion: networking.istio.io/v1alpha3
kind: VirtualService
metadata:
  name: kiali-vs
  namespace: istio-system
spec:
  hosts:
  - "kiali.${INGRESS_DOMAIN}"
  gateways:
  - kiali-gateway
  http:
  - route:
    - destination:
        host: kiali
        port:
          number: 20001
After this you can access the Kiali dashboard at https://kiali.${INGRESS_DOMAIN}.
Ingress
To segregate ingresses I decided to create a separate gateway that resides in my wordpress namespace that only handles WordPress traffic, allowing me to much easier configure separate hostnames and segregate resources.
For simplicity my example below has the Gateway and VirtualService all residing in the same namespace
| apiVersion: networking.istio.io/v1beta1 | |
| kind: Gateway | |
| metadata: | |
| name: wordpressgateway | |
| namespace: wordpress | |
| spec: | |
| selector: | |
| istio: wordpressgateway | |
| servers: | |
| - hosts: | |
| - chemejon.io | |
| port: | |
| name: http-ext | |
| number: 80 | |
| protocol: http | |
| # If you serve HTTPS and want to 301 redirect http requests | |
| # tls: | |
| # httpsRedirect: true | |
| # If you want to serve HTTPS | |
| # - hosts: | |
| # - chemejon.io | |
| # port: | |
| # name: https | |
| # number: 443 | |
| # protocol: HTTPS | |
| # tls: | |
| # credentialName: chemejon-cert | |
| # mode: SIMPLE | |
| --- | |
| apiVersion: networking.istio.io/v1beta1 | |
| kind: VirtualService | |
| metadata: | |
| name: wordpress-vs | |
| namespace: wordpress | |
| spec: | |
| gateways: | |
| - wordpressgateway | |
| hosts: | |
| - chemejon.io | |
| http: | |
| - route: | |
| - destination: | |
| host: wordpress | |
| port: | |
| number: 80 | |
| timeout: 60s |
Im only using HTTP because my blog is served from a hybrid network endpoint group via GCP LB where TLS termination happens ill write a post on that eventually.
Regardless of namespace, Gateways are able to be referenced and route VirtualServices from other namespaces, most commonly you would create a dedicated namespace for just Gateways and have all services route through Gateways in that namespace.
To reference that Gateway you set the gateways: [namespace]/[gateway name]in your VirtualService manifest if you want the VirtualService to reside in a specific namespace.
If your VirtualService is in the Gateway namespace you can reference your host: [namespace]/[host] under your destination block to route to a host in a different namespace.
Egress to External IP
Egress gateways allow you proxy traffic through a Gateway allowing you to have increased disability and security of your cluster egresses. My specific use case was I had an external service that needed to be consumed by one of the services in the mesh and I wanted to direct it through the egress gateway, this service runs on a windows machine and a WorkloadEntry isn’t possible.
Service Entry
A ServiceEntry is created to allow the configured Istio DNS to point at the IP address and port. To test this you can nslookup your endpoint from a pod and you should resolve to the IP address configured.
kind: ServiceEntry
apiVersion: networking.istio.io/v1beta1
metadata:
  name: myapp
  namespace: mynamespace
spec:
  hosts:
    - myapp.local
  ports:
    - number: 80
      protocol: HTTP
      name: http
  resolution: DNS
  endpoints:
    - address: 192.168.0.163
      ports:
        http: 4154
I initially had an issue with resolution and realized that there are two required flags for sidecar injection that need to be enabled for a ServiceEntry to work properly.
apiVersion: v1
data:
  mesh:
    defaultConfig:
      discoveryAddress: istiod.istio-system.svc:15012
        proxyMetadata:
          ISTIO_META_DNS_CAPTURE: "true"
          ISTIO_META_DNS_AUTO_ALLOCATE: "true"
      tracing:
        zipkin:
          address: jaeger-collector.istio-system:9411
    enablePrometheusMerge: true
    rootNamespace: istio-system
    trustDomain: cluster.local
  meshNetworks: 'networks: {}'
kind: ConfigMap
metadata:
  labels:
    install.operator.istio.io/owning-resource: unknown
    install.operator.istio.io/owning-resource-namespace: istio-system
    istio.io/rev: canary
    operator.istio.io/component: Pilot
    operator.istio.io/managed: Reconcile
    operator.istio.io/version: 1.13.4
    release: istio
  name: istio
  namespace: istio-system
I had to enable both ISTIO_META_DNS_CAPTURE and ISTIO_META_DNS_AUTO_ALLOCATE to get my service entry working. You can enable it on a per workload basis on pods as well. You can find that here as well as all the available configurations for istiod.
Destination Rule and Gateway
This DestinationRule and Gateway resources take the initial request and reroute it to the egress gateway if it is internal to the mesh and then the Gateway routes it to the ServiceEntry endpoint specified.
kind: DestinationRule
apiVersion: networking.istio.io/v1beta1
metadata:
  name: myapp
  namespace: mynamespace
spec:
  host: istio-egressgateway.istio-system.svc.cluster.local
  subsets:
    - name: myapp
---
kind: VirtualService
apiVersion: networking.istio.io/v1beta1
metadata:
  name: direct-myapp-through-egress-gateway
  namespace: mynamespace
spec:
  hosts:
    - myapp.local
  gateways:
    - istio-system/istio-egressgateway
    - mesh
  http:
    - match:
        - port: 80
          gateways:
            - mesh
      route:
        - destination:
            host: istio-egressgateway.istio-system.svc.cluster.local
            subset: myapp
            port:
              number: 80
          weight: 100
    - match:
        - port: 80
          gateways:
            - istio-system/istio-egressgateway
      route:
        - destination:
            host: myapp.local
            port:
              number: 80
          weight: 100
After applying these manifests you can not reference your external service using the DNS name myapp.local and your request will flow through the egress gateway allowing you to see the request vs just the generic PassthroughCluster you would normally see.
Additional Configurations
For a cluster that needs heightened egress control, you can specify in meshConifg an outboundTrafficPolicy to restrict egress only to ServiceEntries you have defined in your cluster and preventing the pods from resolving with an external DNS. You can find that tutorial in the Istio documentation here.
Canary Deployments
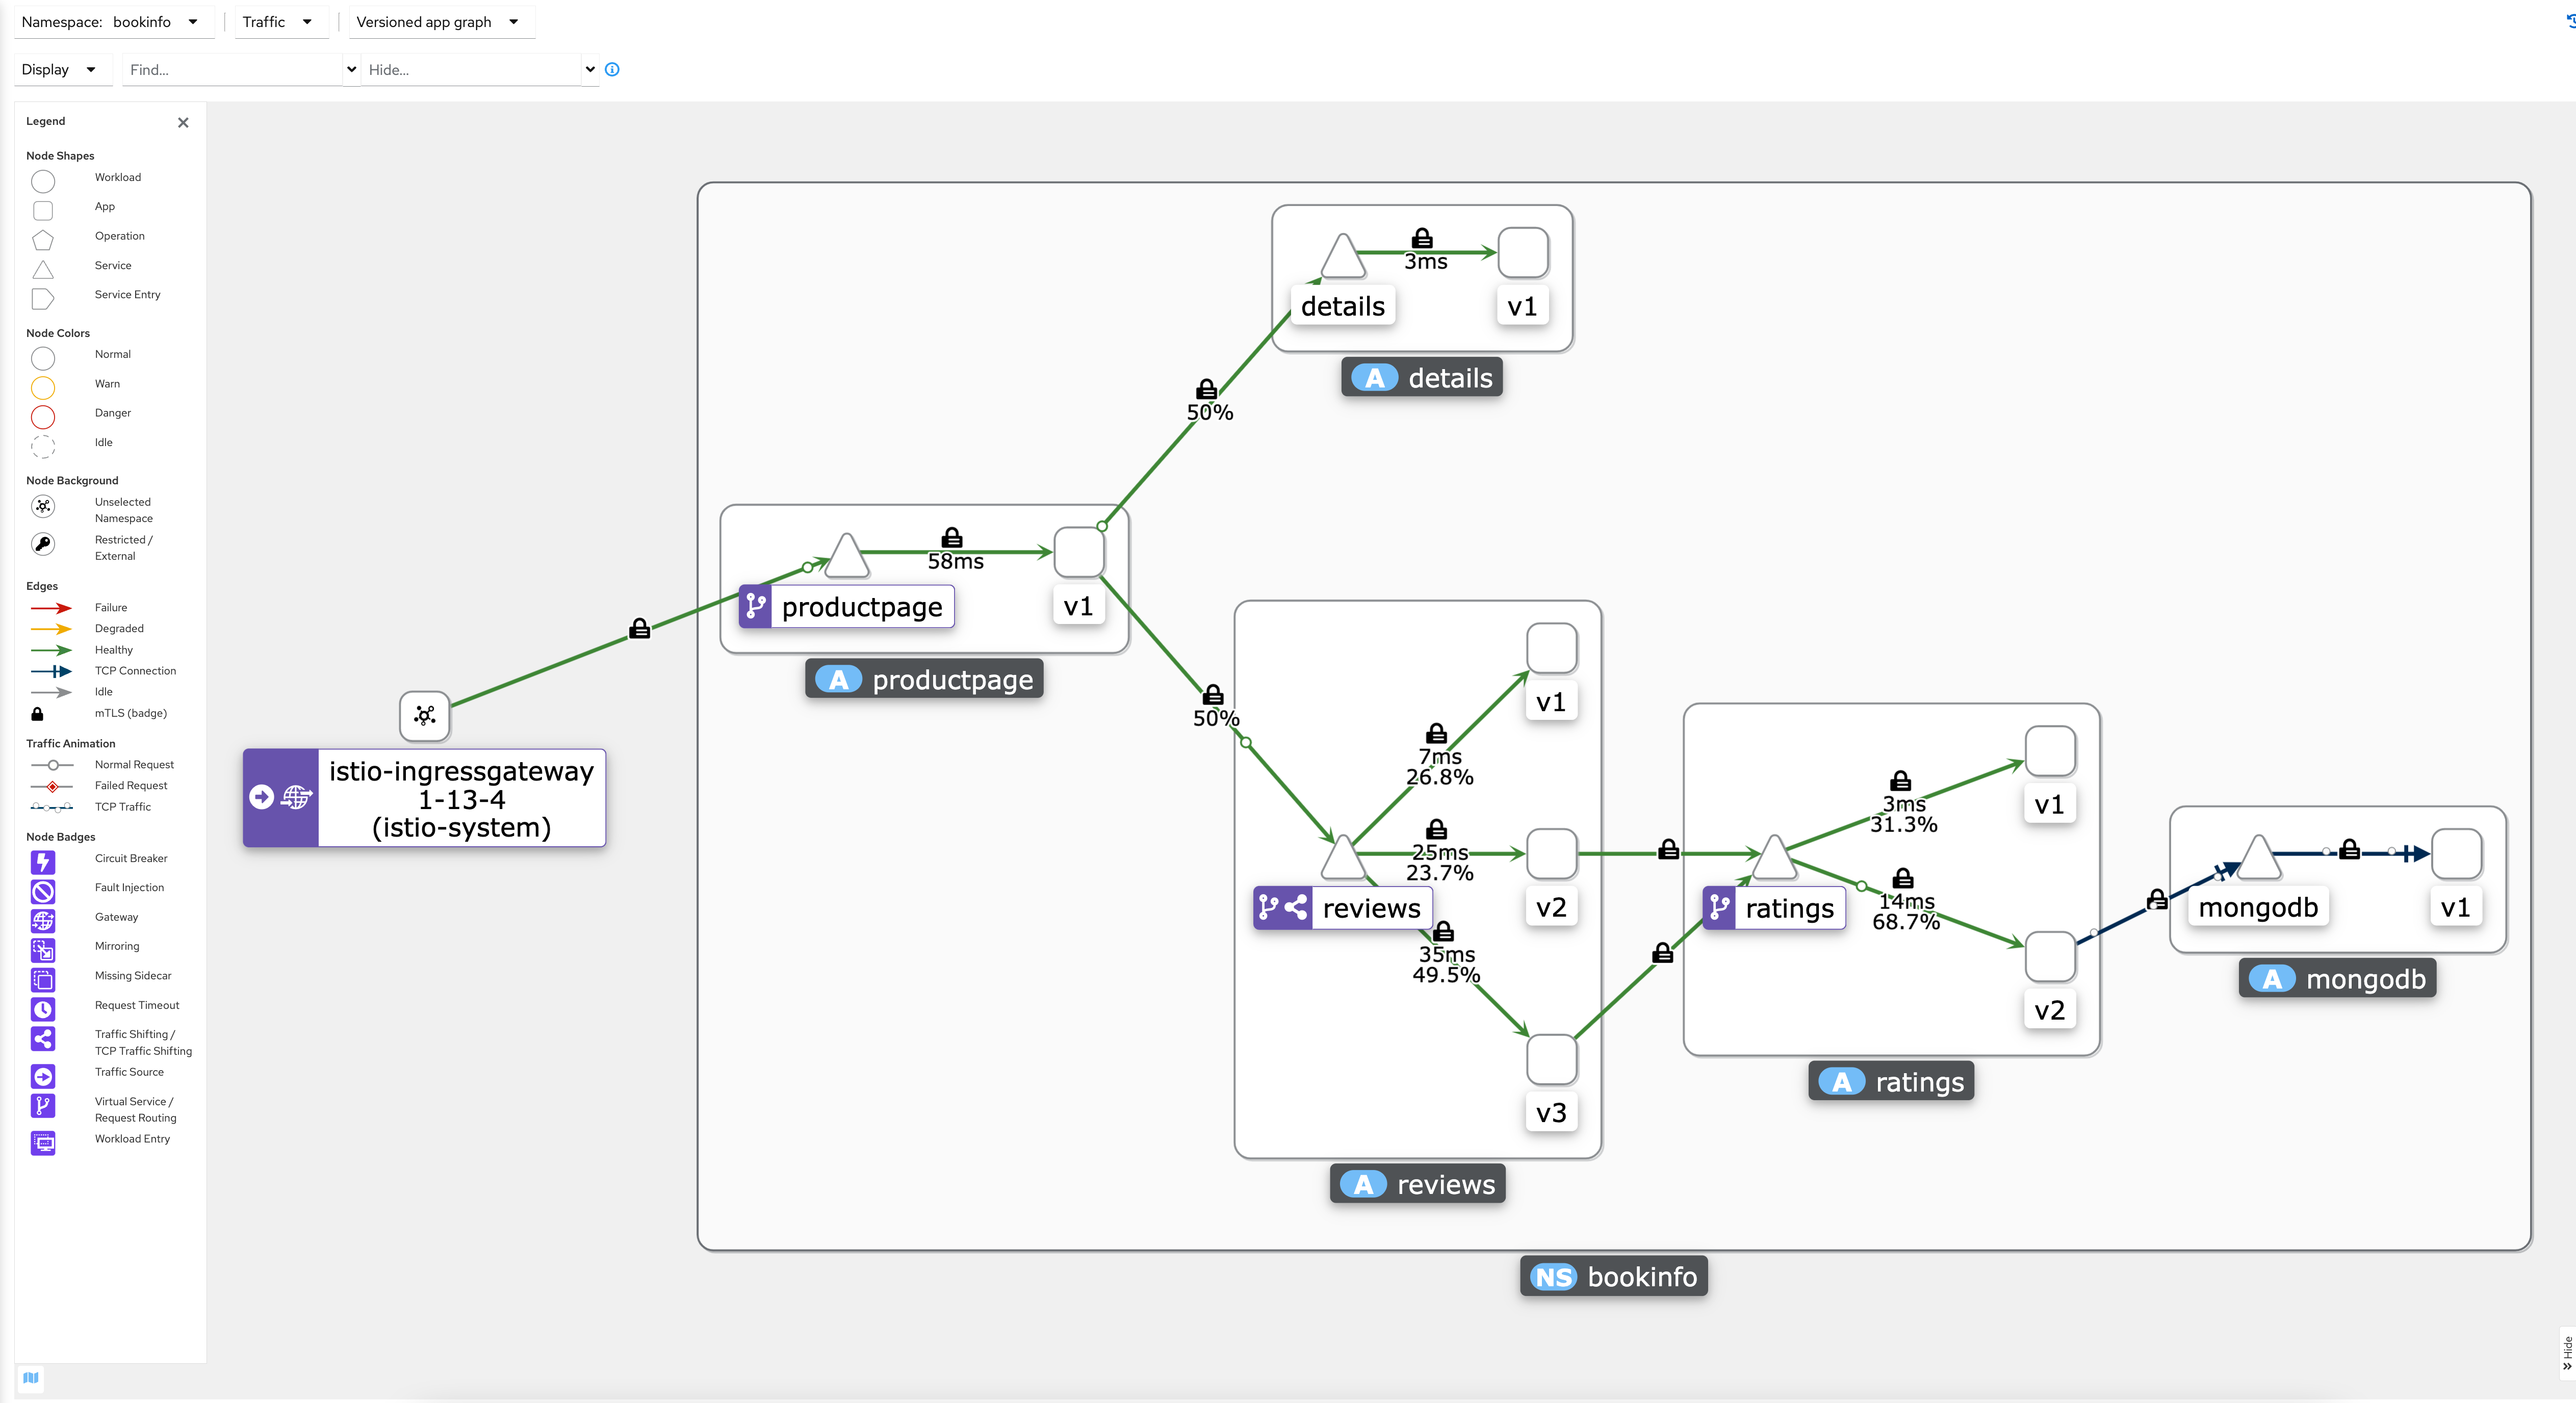
Routing to different versions of an application is useful to canary test. In the example above I am using the bookinfo deployment and routing the following requests:
| Service | Weight | Description |
| reviews v1 | 25% | Does not use ratings service |
| reviews v2 | 25% | Can only use ratings v1 |
| reviews v3 | 50% | Can only use ratings v2 |
| ratings v1 | only reviews v2 | Can only accept reviews v2 requests |
| ratings v2 | only reviews v3 | Can only accept reviews v3 requests, uses mongodb |
Deploy Bookinfo
To deploy bookinfo in the configuration shown above run the following commands.
# Create bookinfo namespace
kubectl create ns bookinfo

# Enable sidecar injection on namespace
kubectl label ns bookinfo istio-injection=enabled

# Deploy base bookinfo deployment
kubectl apply -f samples/bookinfo/platform/kube/bookinfo.yaml -n bookinfo

# Deploy bookinfo-db (ratings v2 uses this)
kubectl apply -f samples/bookinfo/platform/kube/bookinfo-db.yaml -n bookinfo

# Deploy bookinfo-ratings-v2
kubectl apply -f samples/bookinfo/platform/kube/bookinfo-ratings-v2.yaml -n bookinfo

# Creates bookinfo gateway using, istio-ingressgateway in istio-system
kubectl apply -f samples/bookinfo/networking/bookinfo-gateway.yaml -n bookinfo

# Apply default destination rules
kubectl apply -f samples/bookinfo/networking/destination-rule-all-mtls.yaml -n bookinfo
The bookinfo.yaml contains Deployments and Services for:
- productpage (v1)
- details (v1)
- reviews (v1, v2, v3)
- ratings (v1)
The bookinfo-ratings-v2.yaml and bookinfo-db.yaml add a second version of ratings which uses mongodb as the its database.
The destination-rule-all-mtls.yaml create subsets for each of the services for them to be referenced by the VirtualServices and sets M
The bookinfo-gateway.yaml creates a Gateway using the default istio-ingressgateway found in the istio-system namespace and a VirtualService for the productpage frontend.
Verify Deployment and Ingress
To test your Deployment and Gateway you use the following commands below.
# Grabs your ingress IP address
export INGRESS_HOST=$(kubectl -n istio-system get service istio-ingressgateway -o jsonpath='{.status.loadBalancer.ingress[0].ip}')

# Export ingress domain (assuming you did the telemetry setup above)
export INGRESS_DOMAIN=${INGRESS_HOST}.nip.io

# Continuously curl to generate load
watch 'curl http://$INGRESS_DOMAIN/productpage \ | grep -o "<title>.*</title>"'
If everything is setup correctly you should see.
<title>Simple Bookstore App</title>Configure Routing
The app dev team has created 3 versions of the reviews app and wants to separate the divert the traffic to test app speed and stability with the following traffic weights:
- 25% → reviews-v1
- 25% → reviews-v2
- 50% → reviews-v3
Seams simple enough but theres a catch…
The app dev team changed some stuff with the ratings API for their v2 deployment that causes the reviews-v2 to break when sending a request. The team realizes this and implements the solution in reviews-v3 and deploys it out and now you need to route:
- reviews-v2 → ratings-v1
- reviews-v3 → ratings-v2
This can be done with the following VirtualService:
  apiVersion: networking.istio.io/v1alpha3
  kind: VirtualService
  metadata:
    name: reviews
  spec:
    hosts:
      - reviews
    http:
    - route:
      - destination:
          host: reviews
          subset: v1
        weight: 25
      - destination:
          host: reviews
          subset: v2
        weight: 25
      - destination:
          host: reviews
          subset: v3
        weight: 50
 ---
 apiVersion: networking.istio.io/v1alpha3
 kind: VirtualService
 metadata:
   name: ratings
 spec:
   hosts:
   - ratings
   http:
   - match:
     - sourceLabels:
         version: v3
     route:
     - destination:
         host: ratings
         subset: v2
   - match:
     - sourceLabels:
         version: v2
     route:
     - destination:
         host: ratings
         subset: v1
To show the routing is actually happening you can disable the service nodes option under the display dropdown for Kiali.
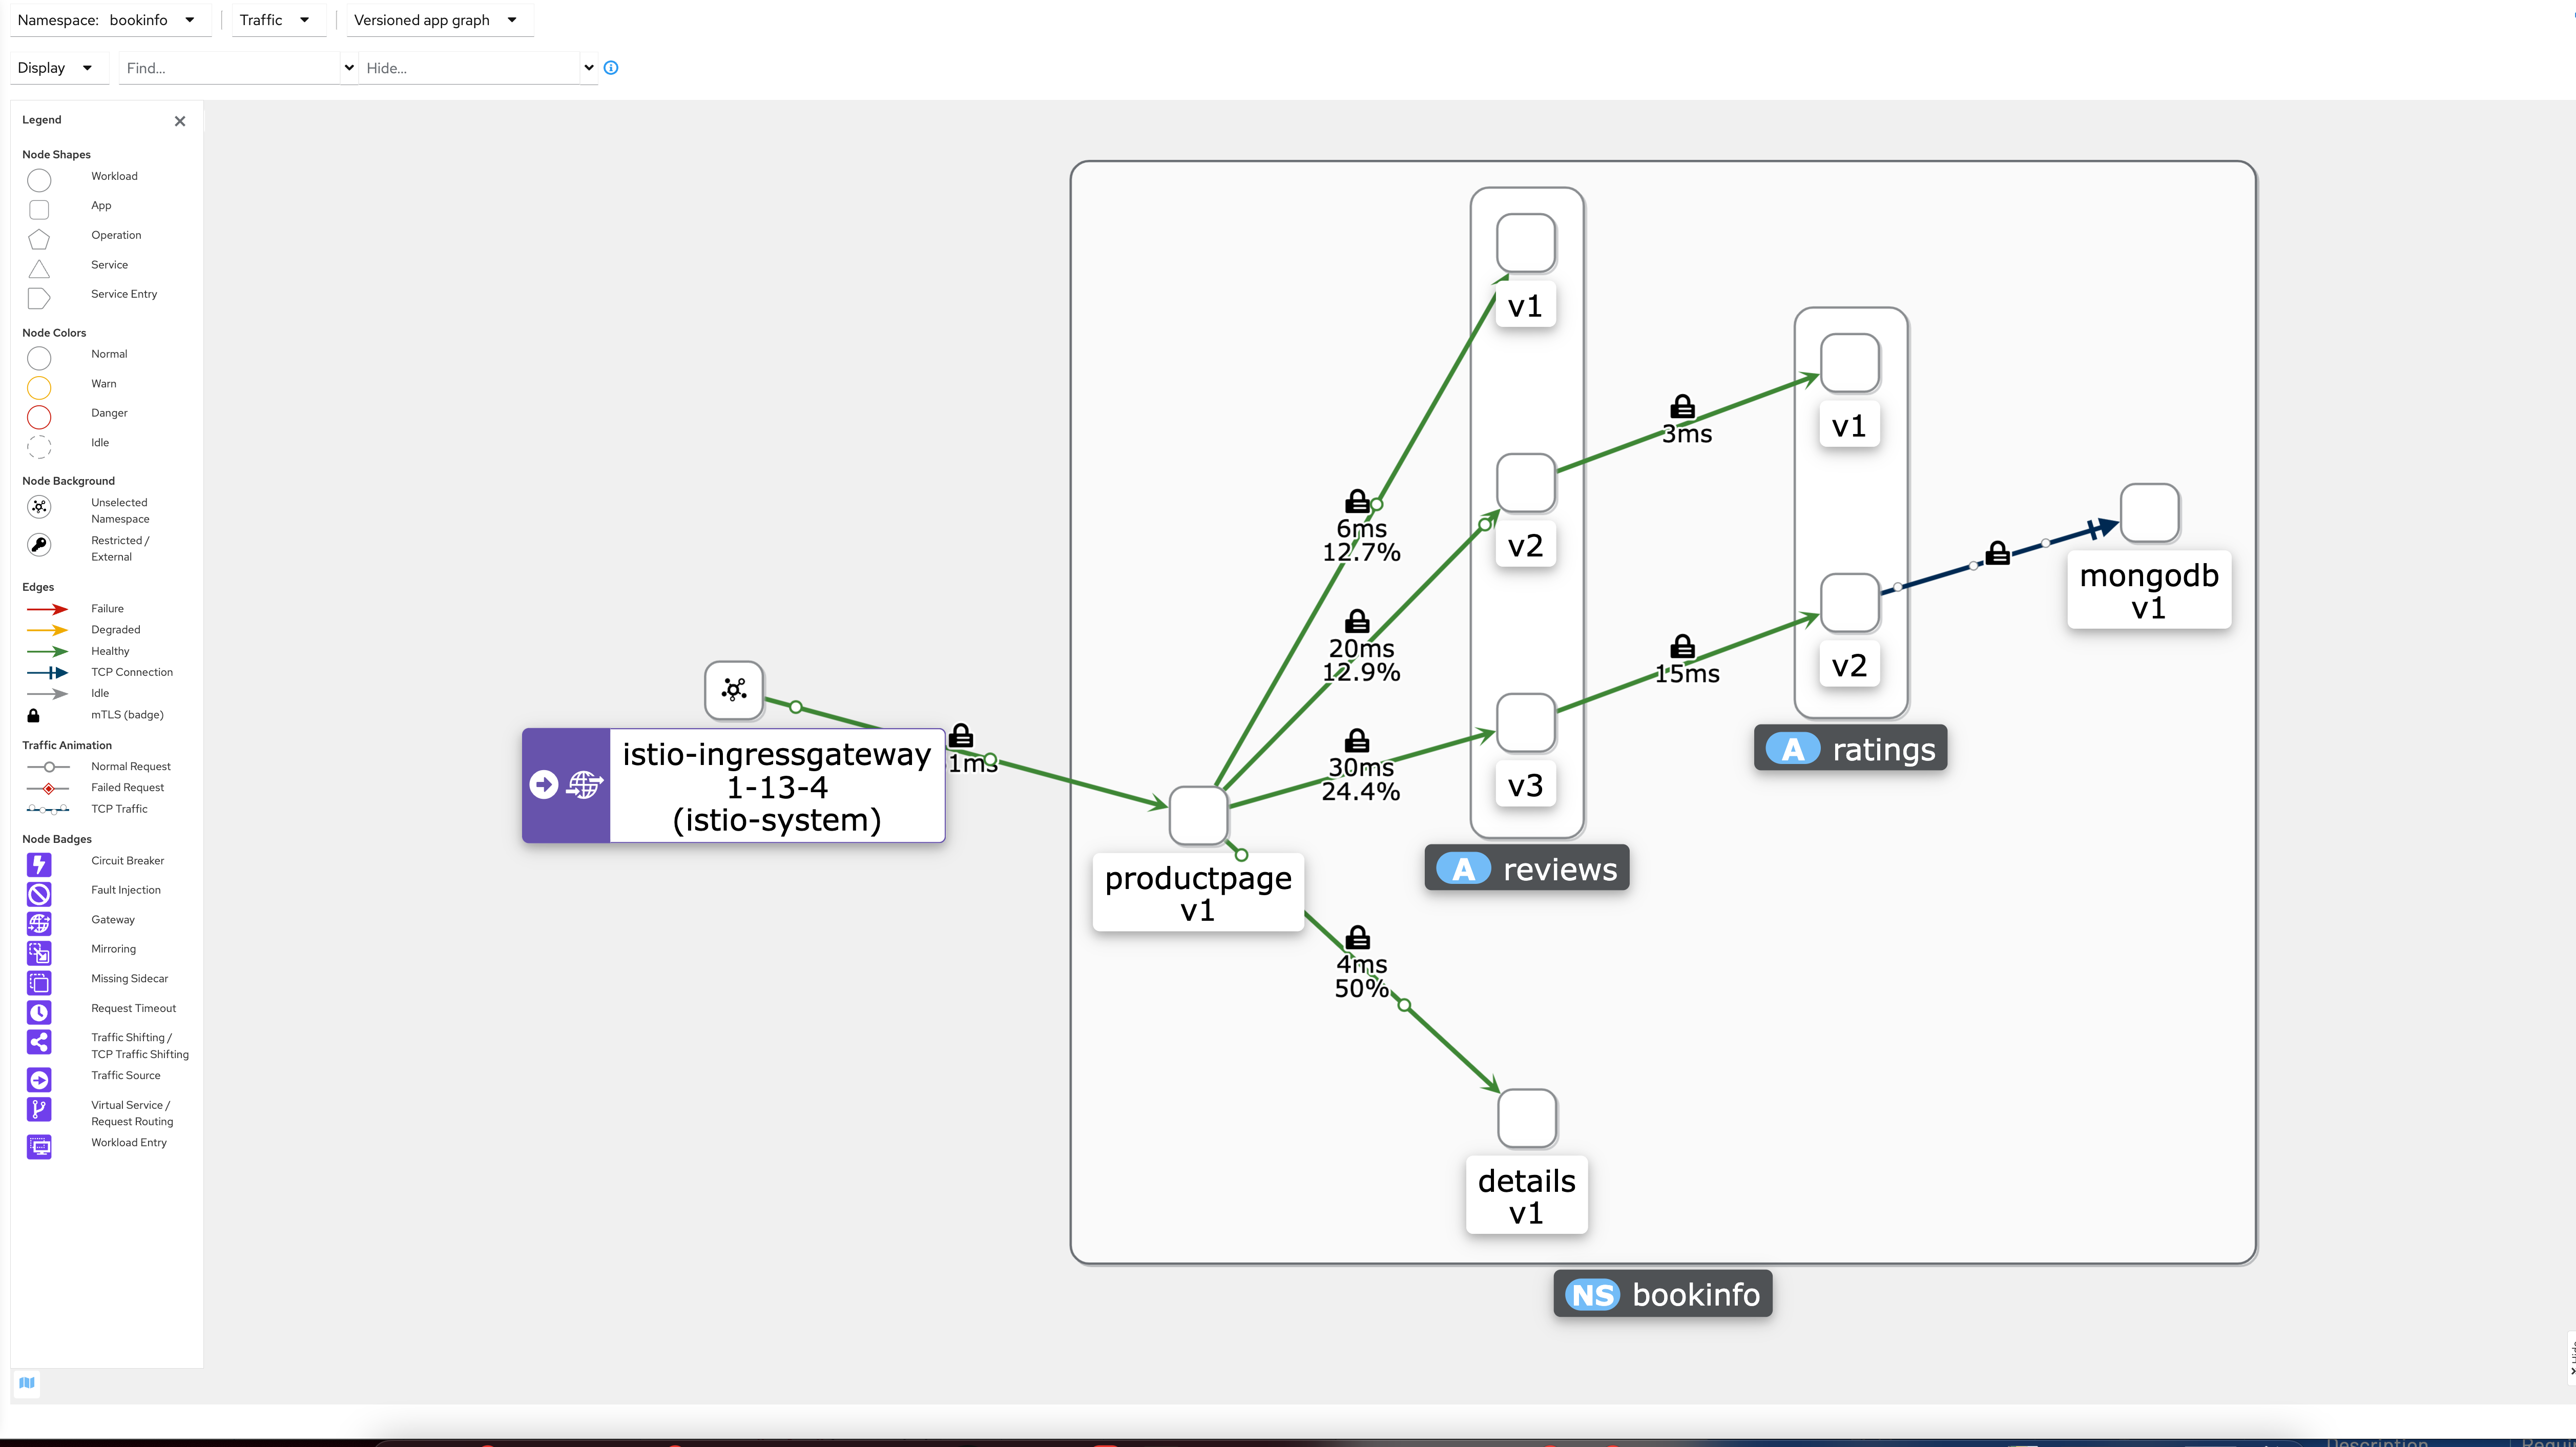
We with out the service nodes we can now verify that the traffic for reviews → ratings are routed correctly.
The Tip of the Iceberg
This post only covers a fraction of what Istio is capable of, most of the use cases are what I use on a daily basis with my personal k8s cluster.
You can read more about what Istio is capable of here. Trust me, I would need several, post just to summarize all of its capabilities.
Whoever spent the time to read everything or just scroll to the bottom, thank you for reading what I have to write and I hope the information has been helpful. I plan on writing some more Istio related posts the deeper I get into it and have other use cases for it.