Recently I needed to save a csv file to a network location in NodeRED. After searching various places on how to mount my drive I finally found a method that uses cifs.
1. Create a location you want to map your drive.
cd /
 mkdir mnt
 mkdir /mnt/
2.Find the local IP address of the computer/drive you want to mount, if you know it skip this step. If you know the computer/drives name you can ping it in terminal and get its IP address.

ping "name of your pc/drive"The local IP address of the target computer will be displayed.
3. Edit your /etc/fstab. I like to use the graphical file manager instead of locating the file in terminal and opening it.
sudo pcmanfm
This opens File Manager as root
Navigate to your main directory then to /etc and find the file named fstab. My prefered editor is Geany, since you ran file manager as root you can just click open with Geany and you will fstab with root privileges.
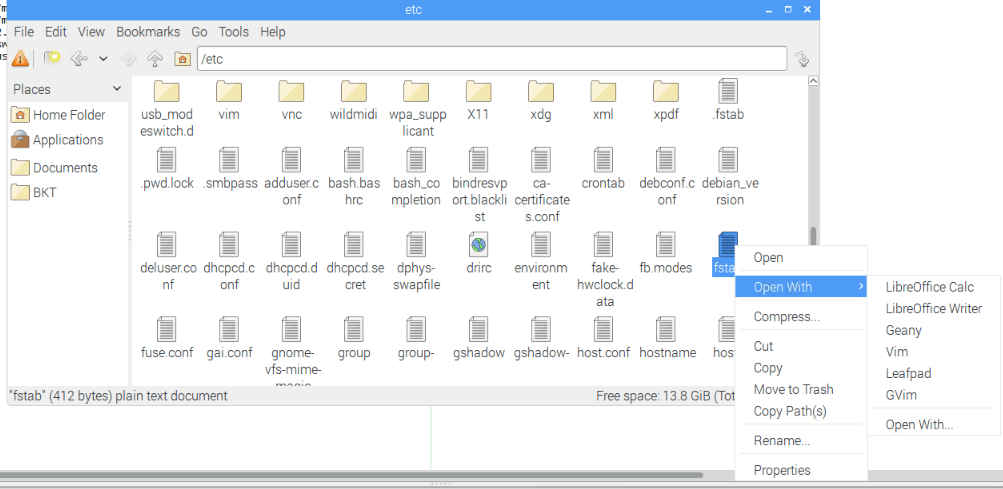
4. Add the following code to your fstab file.
If there are spaces in your path name replace them with \040

//[IPaddress/folder to mount] [location to mount] username=[username],password=[password],iocharset=utf8,sec=ntlm 0 05. Update and load your fstab file.
mount -a6. Navigate to [location to mount] and you should see your network drive. Since we edited the fstab file this will automatically mount on boot.
7. Go to your node red flow and add the path you want to save to just like it was a physical location on your Pi. I have the option to change my file name so mine is formatted in a function node that outputs msg.filename to a file node.
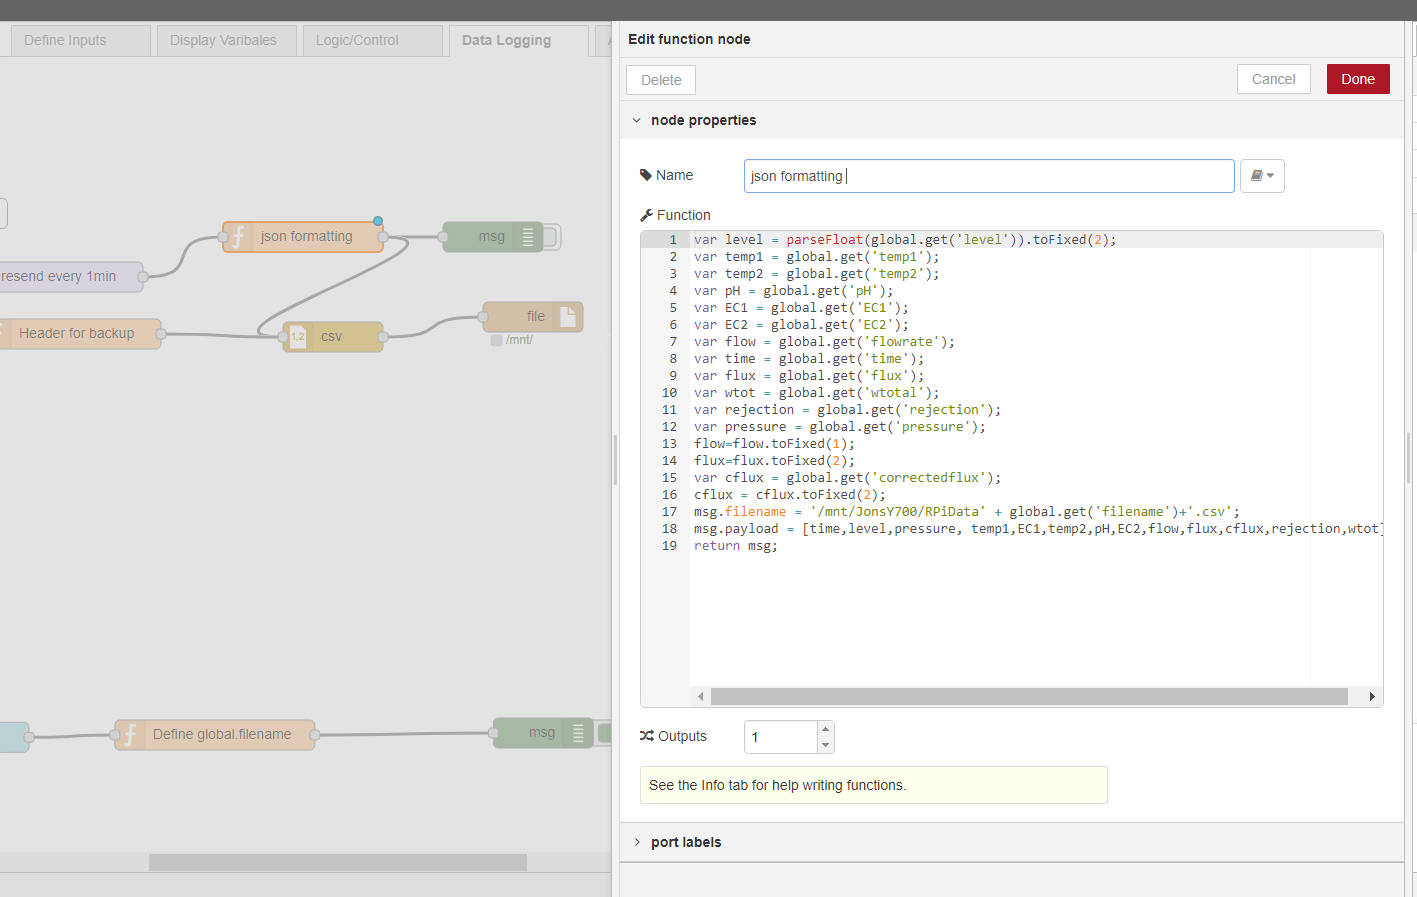
There you go and now your RPi’s data is being saved to a network location to be accessed by every one with access to that computer. This is good if multiple people want use the data collected by your Pi but you don’t want them to ssh/vnc/or have access to other files on your Pi.
Just desire to say your article is as amazing. The clarity in your post is simply great and i can assume you’re an expert on this subject. Well with your permission let me to grab your feed to keep updated with forthcoming post. Thanks a million and please carry on the gratifying work.
Just desire to say your article is as amazing. The clarity in your post is simply great and i can assume you’re an expert on this subject. Well with your permission let me to grab your feed to keep updated with forthcoming post. Thanks a million and please carry on the gratifying work.
Just desire to say your article is as amazing. The clarity in your post is simply great and i can assume you’re an expert on this subject. Well with your permission let me to grab your feed to keep updated with forthcoming post. Thanks a million and please carry on the gratifying work.
Just desire to say your article is as amazing. The clarity in your post is simply great and i can assume you’re an expert on this subject. Well with your permission let me to grab your feed to keep updated with forthcoming post. Thanks a million and please carry on the gratifying work.
I simply must tell you that you have written an excellent and unique article that I really enjoyed reading. I’m fascinated by how well you laid out your material and presented your views. Thank you.Scrapebox Auto Approved
I simply must tell you that you have written an excellent and unique article that I really enjoyed reading. I’m fascinated by how well you laid out your material and presented your views. Thank you.Scrapebox Auto Approved
I simply must tell you that you have written an excellent and unique article that I really enjoyed reading. I’m fascinated by how well you laid out your material and presented your views. Thank you.Scrapebox Auto Approved
I simply must tell you that you have written an excellent and unique article that I really enjoyed reading. I’m fascinated by how well you laid out your material and presented your views. Thank you.Scrapebox Auto Approved
Aprecie su arduo trabajo.
Aprecie su arduo trabajo.
Aprecie su arduo trabajo.
Aprecie su arduo trabajo.
Información valiosa. Afortunadamente, encontré su sitio web sin querer y me sorprende que este accidente no haya ocurrido antes. Lo marqué como favorito.
Información valiosa. Afortunadamente, encontré su sitio web sin querer y me sorprende que este accidente no haya ocurrido antes. Lo marqué como favorito.
fantastic publish, very informative. I wonder why the other experts of this sector don’t understand this. You should continue your writing. I’m confident, you have a huge readers’ base already!
fantastic publish, very informative. I wonder why the other experts of this sector don’t understand this. You should continue your writing. I’m confident, you have a huge readers’ base already!