Introduction
The main advantage of Anthos on BM over Anthos on VMWare for on-prem deployments is the ability to run Anthos clusters without a hypervisor license.

Cluster Types
A bare metal deployment can consist of the following cluster types:
- A user cluster that runs workloads.
- An admin cluster that creates and controls user clusters to run workloads.
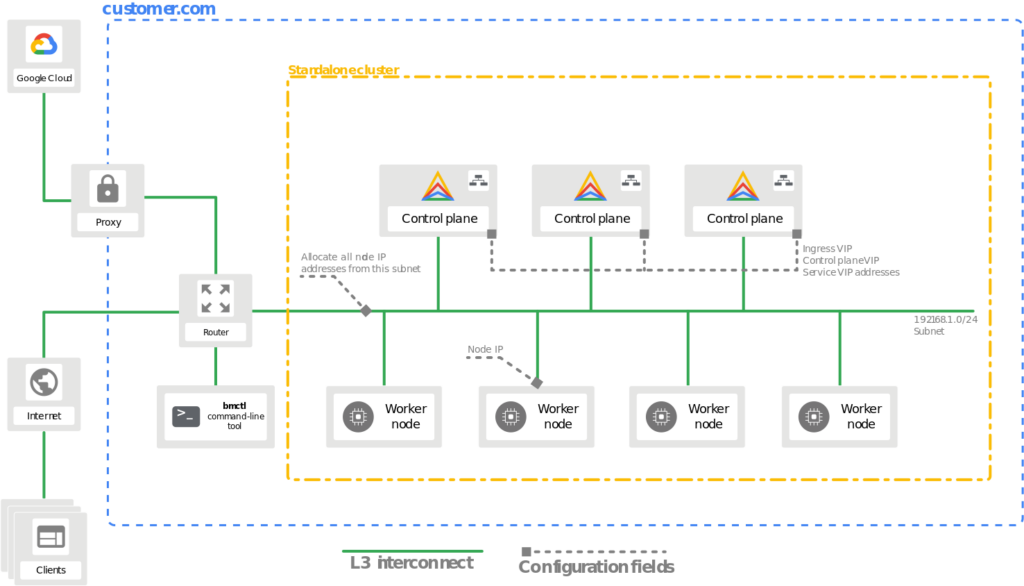
- A standalone cluster is a single cluster that can manage and run workloads, but a standalone cluster can’t create or manage user clusters.
- A hybrid cluster can manage and run workloads, and a hybrid cluster can also create and manage additional user clusters.
In addition to the cluster types, you may select from two different cluster profiles depending on your resource requirements:
- Default: The default profile has standard system resource requirements, and you can use it for all cluster types.
- Edge: The edge profile has significantly reduced system resource requirements. Use of this profile is recommended for edge devices with limited resources. You can only use the edge profile for standalone clusters.
Default Profile Cluster Requirements
All the cluster types are available for use with the default profile, this includes the user, admin, standalone, and hybrid cluster types.
| Resource | Minimum | Recommended |
|---|---|---|
| CPUs / vCPUs | 4 core | 8 core |
| RAM | 16 GB | 32 GB |
| Storage | 128 GB | 256 GB |
Edge Profile Cluster Requirements
Only the standalone cluster type is available for use with the edge profile.
| Resource | Minimum | Recommended |
|---|---|---|
| CPUs / vCPUs | 2 core | 4 core |
| RAM | Ubuntu: 4 GB CentOS/RHEL: 6 GB | Ubuntu: 8 GB CentOS/RHEL: 12 GB |
| Storage | 128 GB | 256 GB |
To configure standalone clusters using the edge profile, follow these best practices:
- Run
bmctlon a separate workstation. If you must runbmctlon the target cluster node, you need 2 GB of memory to meet the minimum requirements. For example, you require 6 GB for Ubuntu and 8 GB for CentOS/Redhat. - Set
MaxPodsPerNodeto 110. The cluster runs no more than 30 user pods per node on average. You might need extra resources for a higher MaxPodsPerNode configuration or run more than 30 user pods per node. - Use
containerdas the container runtime. You might need extra resources to run with the Docker container runtime. - Kubevirt components are not considered in this minimum resource configuration. Kubevirt requires additional resources depending on the number of VMs deployed in the cluster.
Number of Machines Needed
Anthos clusters on bare metal requires at least one machine, which serves as both workstation and cluster node. For highly available (HA) nodes and improved performance, we suggest a realistic minimum of five machines meeting the recommended resource requirements.
Operating System Requirements
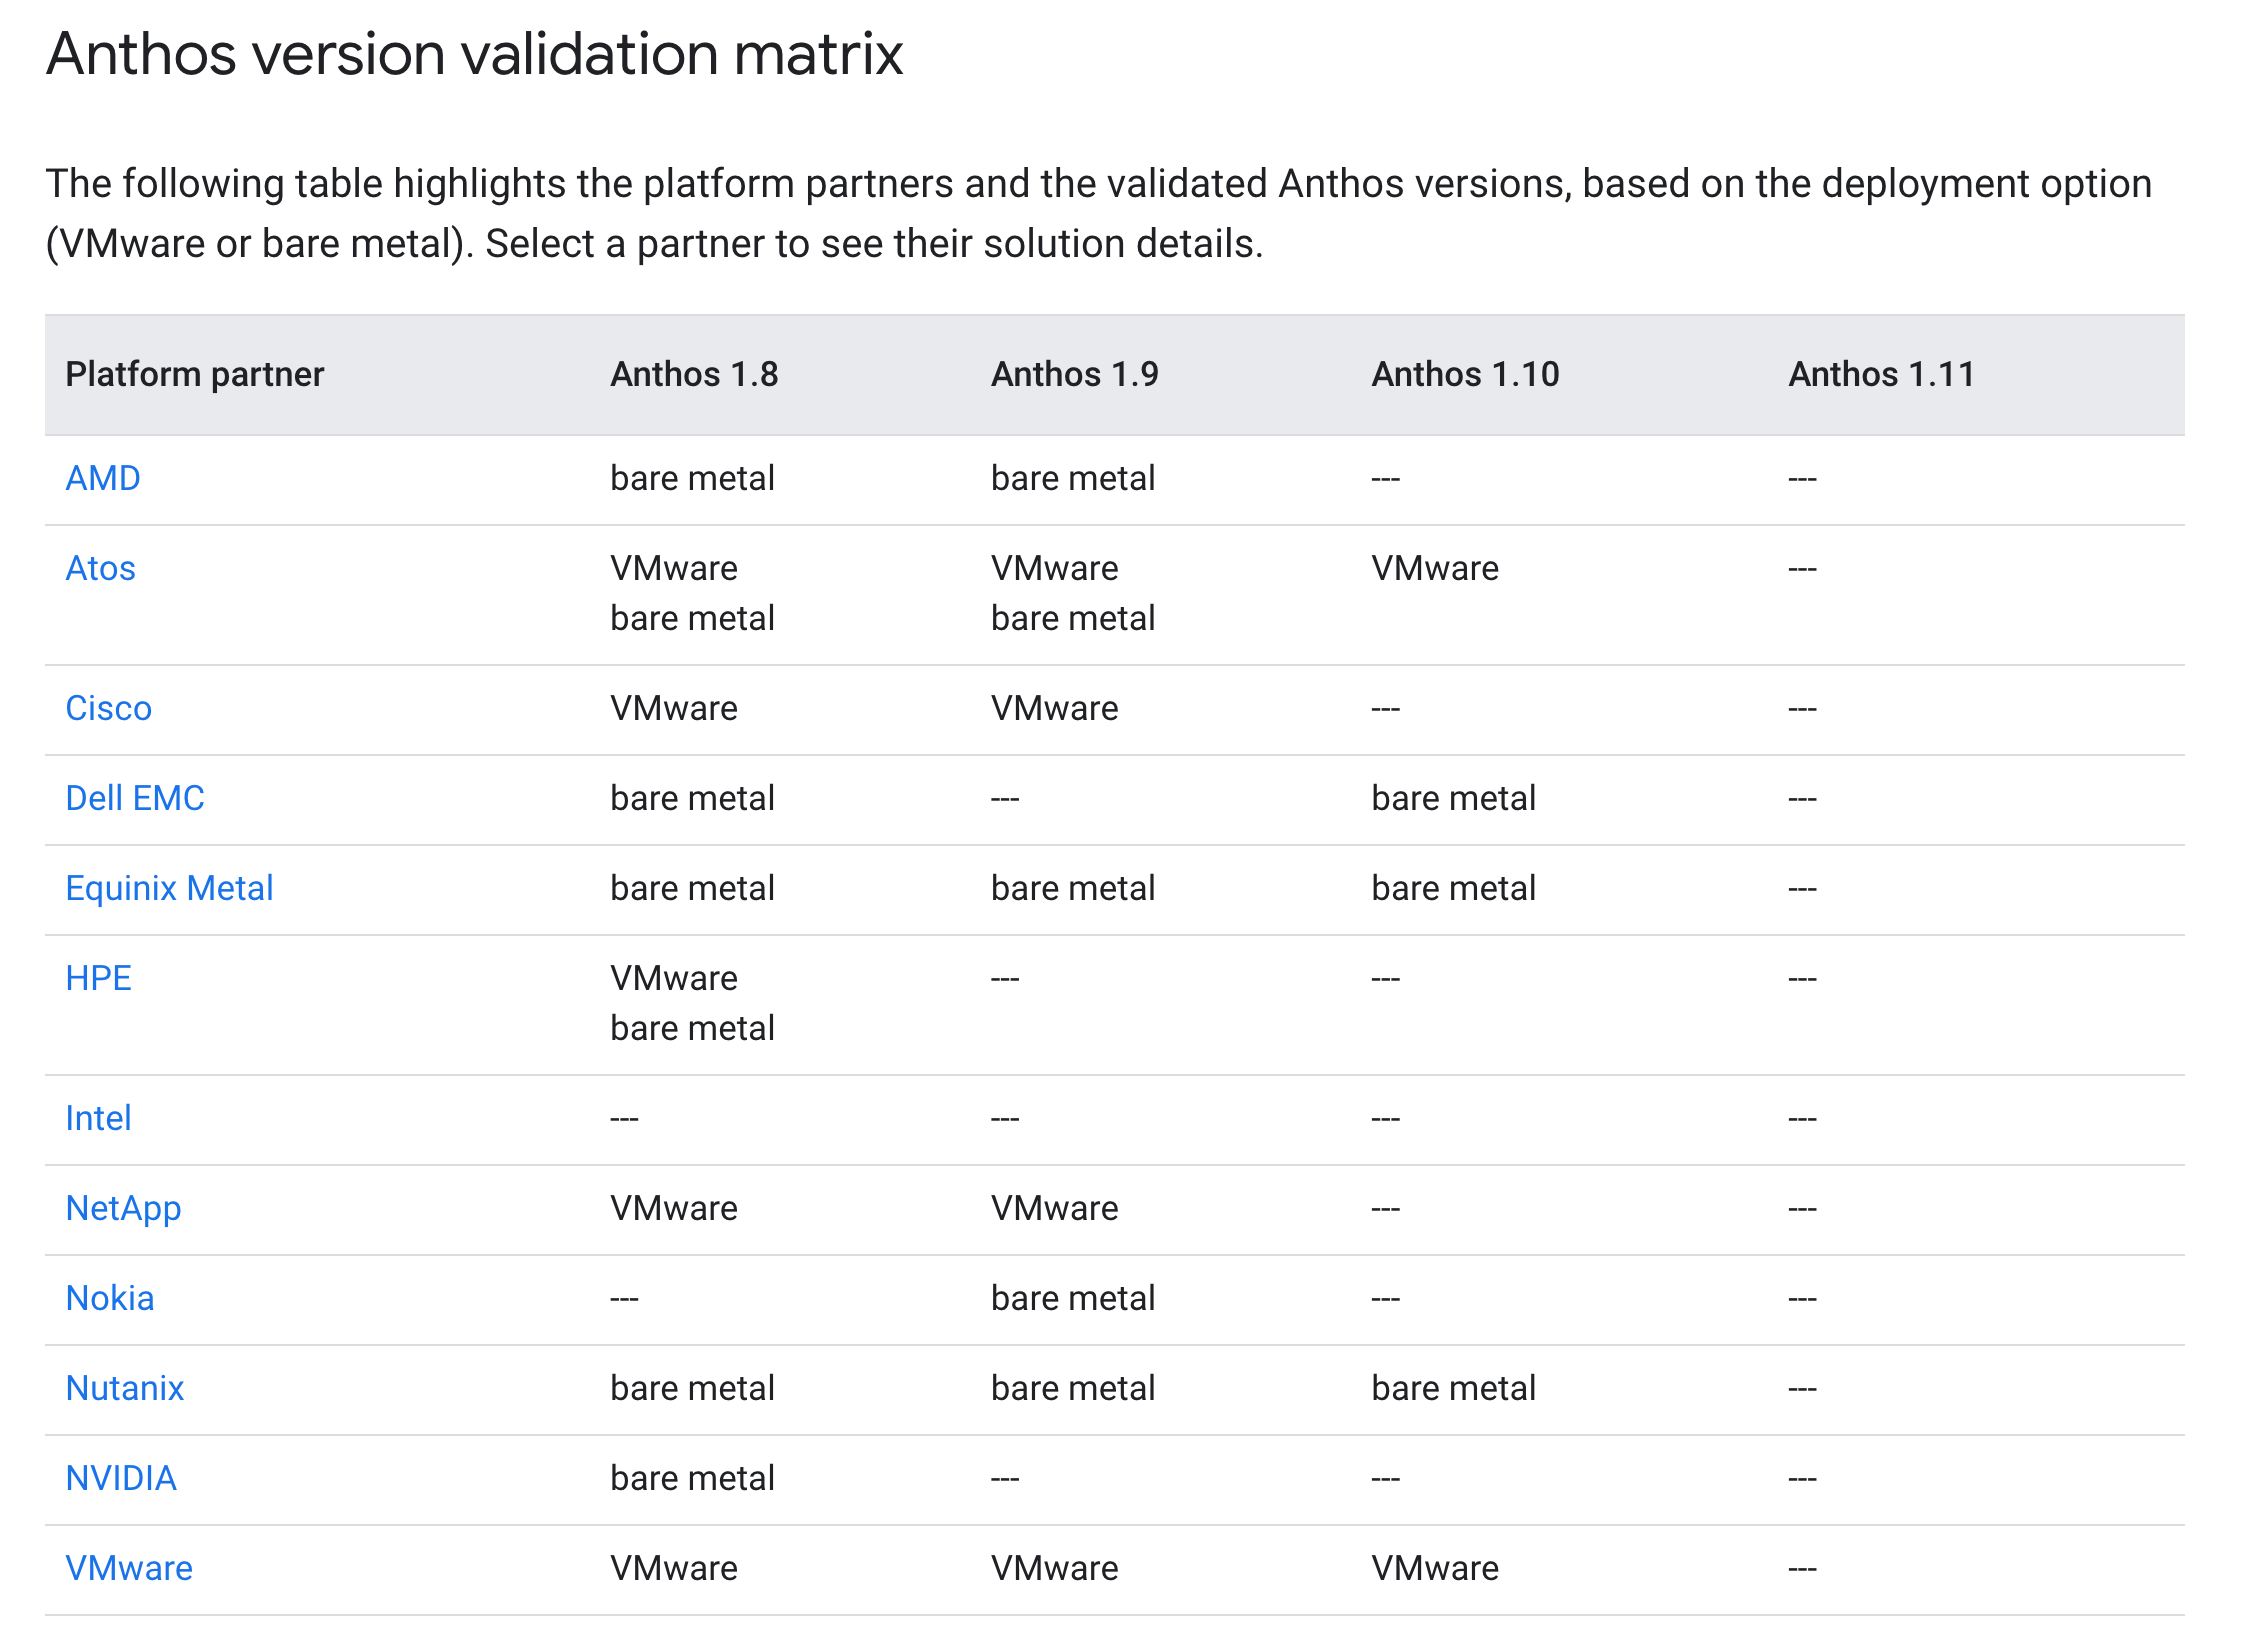
Anthos on BM requires Linux kernel version 4.17.0 or newer, below is a list of operating systems that fulfill this requirement.
| CentOS | Red Hat Enterprise Linux (RHEL) | Ubuntu |
| 8.1 | 8.1 | 18.04.2+ |
| 8.2 | 8.2 | 20.04 |
| 8.3 | 8.3 | 22.04 |
| 8.4 | 8.4 | |
| 8.5 | 8.5 |
Preparation
This guide is deployed on Ubuntu Server v20.04, please modify as needed for your selected disto.
Workstation
- Select a supported operating system from the above list.
- Create the workstation vm with at least 50GB of free disk space
- The workstation VM should have layer 3 connectivity to all the cluster node machines (can ping the other machines)
- If deploying on VMware make sure to set disk.EnableUUID to TRUE
- Install Docker version 19.03 or later
- Install gcloud
- Create your node machines
- Run
ssh-copy-id root@<node ip address> - Run
gcloud auth login --update-adc - Run
gcloud components install kubectl
Node Machine
- Create a VM with the same disto as your workstation VM, with the minimum hardware specifications mentioned in Default Profile Cluster Requirements.
- Run
sudo systemctl stop ufwto disable firewall - Configure
/etc/ssh/sshd_configto allow passwordless ssh root access by adding PermitRootLogin yes to the file. - Return to workstation preparation
Installing and Configuring Anthos on Bare Metal
Installing bmctl on Workstation
gsutil cp gs://anthos-baremetal-release/bmctl/1.8.2/linux-amd64/bmctl bmctl
chmod a+x bmctl
Configuring the Bare Metal config file
./bmctl create config -c CLUSTER_NAME \
--enable-apis --create-service-accounts --project-id=PROJECT_ID
Edit the generated config file, below is my config file for 2 hybrid clusters using the bundled load balancer. All machines have IP addresses on the 192.168.0.0/24 subnet, so anything in the configuration file that references that subnet should be on that main subnet. All other subnet references are up to your desecration reference Network Requirements to properly configure other subnets to your needs.
# bmctl configuration variables. Because this section is valid YAML but not a valid Kubernetes
# resource, this section can only be included when using bmctl to
# create the initial admin/hybrid cluster. Afterwards, when creating user clusters by directly
# applying the cluster and node pool resources to the existing cluster, you must remove this
# section.
gcrKeyPath: bmctl-workspace/.sa-keys/baremetal-gcr.json
sshPrivateKeyPath: bmctl-workspace/.sa-keys/id_rsa
gkeConnectAgentServiceAccountKeyPath: bmctl-workspace/.sa-keys/baremetal-connect.json
gkeConnectRegisterServiceAccountKeyPath: bmctl-workspace/.sa-keys/baremetal-register.json
cloudOperationsServiceAccountKeyPath: bmctl-workspace/.sa-keys/baremetal-cloud-ops.json
---
apiVersion: v1
kind: Namespace
metadata:
  name: cluster-jon-anthosbm-hybrid
---
apiVersion: baremetal.cluster.gke.io/v1
kind: Cluster
metadata:
  name: jon-anthosbm-hybrid
  namespace: cluster-jon-anthosbm-hybrid
spec:
  # Cluster type. This can be:
  #   1) admin:  to create an admin cluster. This can later be used to create user clusters.
  #   2) user:   to create a user cluster. Requires an existing admin cluster.
  #   3) hybrid: to create a hybrid cluster that runs admin cluster components and user workloads.
  #   4) standalone: to create a cluster that manages itself, runs user workloads, but does not manage other clusters.
  type: hybrid
  # Anthos cluster version.
  anthosBareMetalVersion: 1.8.2
  # GKE connect configuration
  gkeConnect:
    projectID: <PROJECT_ID>
  # Control plane configuration
  controlPlane:
    nodePoolSpec:
      nodes:
      # Control plane node pools. Typically, this is either a single machine
      # or 3 machines if using a high availability deployment.
      - address: 192.168.0.231
  # Cluster networking configuration
  clusterNetwork:
    # Pods specify the IP ranges from which pod networks are allocated.
    pods:
      cidrBlocks:
      - 172.16.0.0/16
    # Services specify the network ranges from which service virtual IPs are allocated.
    # This can be any RFC1918 range that does not conflict with any other IP range
    # in the cluster and node pool resources.
    services:
      cidrBlocks:
      - 10.96.0.0/20
  # Load balancer configuration
  loadBalancer:
    # Load balancer mode can be either 'bundled' or 'manual'.
    # In 'bundled' mode a load balancer will be installed on load balancer nodes during cluster creation.
    # In 'manual' mode the cluster relies on a manually-configured external load balancer.
    mode: bundled
    # Load balancer port configuration
    ports:
      # Specifies the port the load balancer serves the Kubernetes control plane on.
      # In 'manual' mode the external load balancer must be listening on this port.
      controlPlaneLBPort: 443
    # There are two load balancer virtual IP (VIP) addresses: one for the control plane
    # and one for the L7 Ingress service. The VIPs must be in the same subnet as the load balancer nodes.
    # These IP addresses do not correspond to physical network interfaces.
    vips:
      # ControlPlaneVIP specifies the VIP to connect to the Kubernetes API server.
      # This address must not be in the address pools below.
      controlPlaneVIP: 192.168.0.234
      # IngressVIP specifies the VIP shared by all services for ingress traffic.
      # Allowed only in non-admin clusters.
      # This address must be in the address pools below.
      ingressVIP: 192.168.0.235
    # AddressPools is a list of non-overlapping IP ranges for the data plane load balancer.
    # All addresses must be in the same subnet as the load balancer nodes.
    # Address pool configuration is only valid for 'bundled' LB mode in non-admin clusters.
    addressPools:
    - name: pool1
      addresses:
       # Each address must be either in the CIDR form (1.2.3.0/24)
    #   # or range form (1.2.3.1-1.2.3.5).
      - 192.168.0.235-192.168.0.240
    # A load balancer node pool can be configured to specify nodes used for load balancing.
    # These nodes are part of the Kubernetes cluster and run regular workloads as well as load balancers.
    # If the node pool config is absent then the control plane nodes are used.
    # Node pool configuration is only valid for 'bundled' LB mode.
    # nodePoolSpec:
    #  nodes:
    #  - address: <Machine 1 IP>
  # Proxy configuration
  # proxy:
  #   url: http://[username:password@]domain
  #   # A list of IPs, hostnames or domains that should not be proxied.
  #   noProxy:
  #   - 127.0.0.1
  #   - localhost
  # Logging and Monitoring
  clusterOperations:
    # Cloud project for logs and metrics.
    projectID: <PROJECT_ID>
    # Cloud location for logs and metrics.
    location: us-central1
    # Enable Cloud Audit Logging if uncommented and set to false.
    # disableCloudAuditLogging: false
    # Whether collection of application logs/metrics should be enabled (in addition to
    # collection of system logs/metrics which correspond to system components such as
    # Kubernetes control plane or cluster management agents).
    # enableApplication: false
  # Storage configuration
  storage:
    # lvpNodeMounts specifies the config for local PersistentVolumes backed by mounted disks.
    # These disks need to be formatted and mounted by the user, which can be done before or after
    # cluster creation.
    lvpNodeMounts:
      # path specifies the host machine path where mounted disks will be discovered and a local PV
      # will be created for each mount.
      path: /mnt/localpv-disk
      # storageClassName specifies the StorageClass that PVs will be created with. The StorageClass
      # is created during cluster creation.
      storageClassName: local-disks
    # lvpShare specifies the config for local PersistentVolumes backed by subdirectories in a shared filesystem.
    # These subdirectories are automatically created during cluster creation.
    lvpShare:
      # path specifies the host machine path where subdirectories will be created on each host. A local PV
      # will be created for each subdirectory.
      path: /mnt/localpv-share
      # storageClassName specifies the StorageClass that PVs will be created with. The StorageClass
      # is created during cluster creation.
      storageClassName: local-shared
      # numPVUnderSharedPath specifies the number of subdirectories to create under path.
      numPVUnderSharedPath: 5
  # NodeConfig specifies the configuration that applies to all nodes in the cluster.
  nodeConfig:
    # podDensity specifies the pod density configuration.
    podDensity:
      # maxPodsPerNode specifies at most how many pods can be run on a single node.
      maxPodsPerNode: 250
    # containerRuntime specifies which container runtime to use for scheduling containers on nodes.
    # containerd and docker are supported.
    containerRuntime: docker
  # KubeVirt configuration, uncomment this section if you want to install kubevirt to the cluster
  # kubevirt:
  #   # if useEmulation is enabled, hardware accelerator (i.e relies on cpu feature like vmx or svm)
  #   # will not be attempted. QEMU will be used for software emulation.
  #   # useEmulation must be specified for KubeVirt installation
  #   useEmulation: false
  # Authentication; uncomment this section if you wish to enable authentication to the cluster with OpenID Connect.
  # authentication:
  #   oidc:
  #     # issuerURL specifies the URL of your OpenID provider, such as "https://accounts.google.com". The Kubernetes API
  #     # server uses this URL to discover public keys for verifying tokens. Must use HTTPS.
  #     issuerURL: <URL for OIDC Provider; required>
  #     # clientID specifies the ID for the client application that makes authentication requests to the OpenID
  #     # provider.
  #     clientID: <ID for OIDC client application; required>
  #     # clientSecret specifies the secret for the client application.
  #     clientSecret: <Secret for OIDC client application; optional>
  #     # kubectlRedirectURL specifies the redirect URL (required) for the gcloud CLI, such as
  #     # "http://localhost:[PORT]/callback".
  #     kubectlRedirectURL: <Redirect URL for the gcloud CLI; optional, default is "http://kubectl.redirect.invalid">
  #     # username specifies the JWT claim to use as the username. The default is "sub", which is expected to be a
  #     # unique identifier of the end user.
  #     username: <JWT claim to use as the username; optional, default is "sub">
  #     # usernamePrefix specifies the prefix prepended to username claims to prevent clashes with existing names.
  #     usernamePrefix: <Prefix prepended to username claims; optional>
  #     # group specifies the JWT claim that the provider will use to return your security groups.
  #     group: <JWT claim to use as the group name; optional>
  #     # groupPrefix specifies the prefix prepended to group claims to prevent clashes with existing names.
  #     groupPrefix: <Prefix prepended to group claims; optional>
  #     # scopes specifies additional scopes to send to the OpenID provider as a comma-delimited list.
  #     scopes: <Additional scopes to send to OIDC provider as a comma-separated list; optional>
  #     # extraParams specifies additional key-value parameters to send to the OpenID provider as a comma-delimited
  #     # list.
  #     extraParams: <Additional key-value parameters to send to OIDC provider as a comma-separated list; optional>
  #     # proxy specifies the proxy server to use for the cluster to connect to your OIDC provider, if applicable.
  #     # Example: https://user:password@10.10.10.10:8888. If left blank, this defaults to no proxy.
  #     proxy: <Proxy server to use for the cluster to connect to your OIDC provider; optional, default is no proxy>
  #     # deployCloudConsoleProxy specifies whether to deploy a reverse proxy in the cluster to allow Google Cloud
  #     # Console access to the on-premises OIDC provider for authenticating users. If your identity provider is not
  #     # reachable over the public internet, and you wish to authenticate using Google Cloud Console, then this field
  #     # must be set to true. If left blank, this field defaults to false.
  #     deployCloudConsoleProxy: <Whether to deploy a reverse proxy for Google Cloud Console authentication; optional>
  #     # certificateAuthorityData specifies a Base64 PEM-encoded certificate authority certificate of your identity
  #     # provider. It's not needed if your identity provider's certificate was issued by a well-known public CA.
  #     # However, if deployCloudConsoleProxy is true, then this value must be provided, even for a well-known public
  #     # CA.
  #     certificateAuthorityData: <Base64 PEM-encoded certificate authority certificate of your OIDC provider; optional>
  # Node access configuration; uncomment this section if you wish to use a non-root user
  # with passwordless sudo capability for machine login.
  # nodeAccess:
  #   loginUser: <login user name>
---
# Node pools for worker nodes
apiVersion: baremetal.cluster.gke.io/v1
kind: NodePool
metadata:
  name: node-pool-1
  namespace: cluster-jon-anthosbm-hybrid
spec:
  clusterName: jon-anthosbm-hybrid
  nodes:
  - address: 192.168.0.232
Creating the Cluster
./bmctl create cluster -c CLUSTER_NAME
Signing in and Authenticating with Google
For cluster sign-in I opted to use OIDC, please refer to the guide below to configure ODIC to sign in to your cluster.
Authenticating with OIDC using Google
Note: To view pods and resources in the cluster you must give the correct permissions to your ODIC sign-in user. Below is a kind: ClusterRoleBindingexample I used to provide permissions. I added my user to the default cluster-admin kind: ClusterRole, however you can create a separate kind: ClusterRoleBindingand kind: ClusterRole to assign specific privileges.
apiVersion: rbac.authorization.k8s.io/v1
kind: ClusterRoleBinding
metadata:
  annotations:
    rbac.authorization.kubernetes.io/autoupdate: "true"
  creationTimestamp: "2021-08-19T17:31:55Z"
  labels:
    kubernetes.io/bootstrapping: rbac-defaults
  name: cluster-admin
  resourceVersion: "1782051"
  uid: 3c587468-6270-4a27-92ff-775be039af14
roleRef:
  apiGroup: rbac.authorization.k8s.io
  kind: ClusterRole
  name: cluster-admin
subjects:
- apiGroup: rbac.authorization.k8s.io
  kind: Group
  name: system:masters
- apiGroup: rbac.authorization.k8s.io
  kind: User
  name: jon.chen@yourdomain.com
Storage Overview
Anthos on BM has 3 options for storage:
- Ephemeral Storage through Kubernetes volumes
- Persistent Storage through CSI Drivers
- Persistent Storage through Local Volumes
Ephemeral Storage through Kubernetes Volumes
Ephemeral storage does not persist after a pod is destroyed/deleted. The storage units are accessible to containers in a Pod and are generally used for storing configuration information or cache space. Some volume types that are backed by ephemeral storage include; emptyDir, ConfigMap, and Secrets.
Persistent Storage through CSI Drivers
PersistentVolumes can be created for durable storage that persists after a pods lifetime. Anthos clusters on bare metal is compatible with CSI v1.0 drivers. A list of Anthos Ready storage partners are listed below. To use a CSI in your cluster, deploy the CSI driver and configure workloads to use the CSI driver with the StorageClass API. As long as your underlying kubernetes version supports the CSI the driver should work with Anthos, the below list is additional validation done by google and does not mean that drivers not present do not work.

Persistent Storage through Local Volumes
Persistent storage can also be configured with local volumes. The setback with this is that the pods are bound to the specific disk and node the local storage volume is persisted on.
Persistent Storage through Local Volumes have three types of storage classes:
- LVP Share
- LVP Node Mounts
- Anthos System
- OpenEBS
LVP Share
A LVP share creates a local persistent volume that subdirectories in a local or shared file system are backing.
LVP Node Mount
LVP node mounts creates a local persistent volume for each mounted disk in the configured directory. A disk must created, formatted and mounted either before or after cluster creation.
Anthos System
An Anthos system storage class is pre-configured as a local persistent volume for the Anthos system pods to use. This storage class should not be changed or deleted and should not be used for stateful workloads. The default LVP mount options in the config file should not be changed as they are used for the Anthos System mount.
OpenEBS
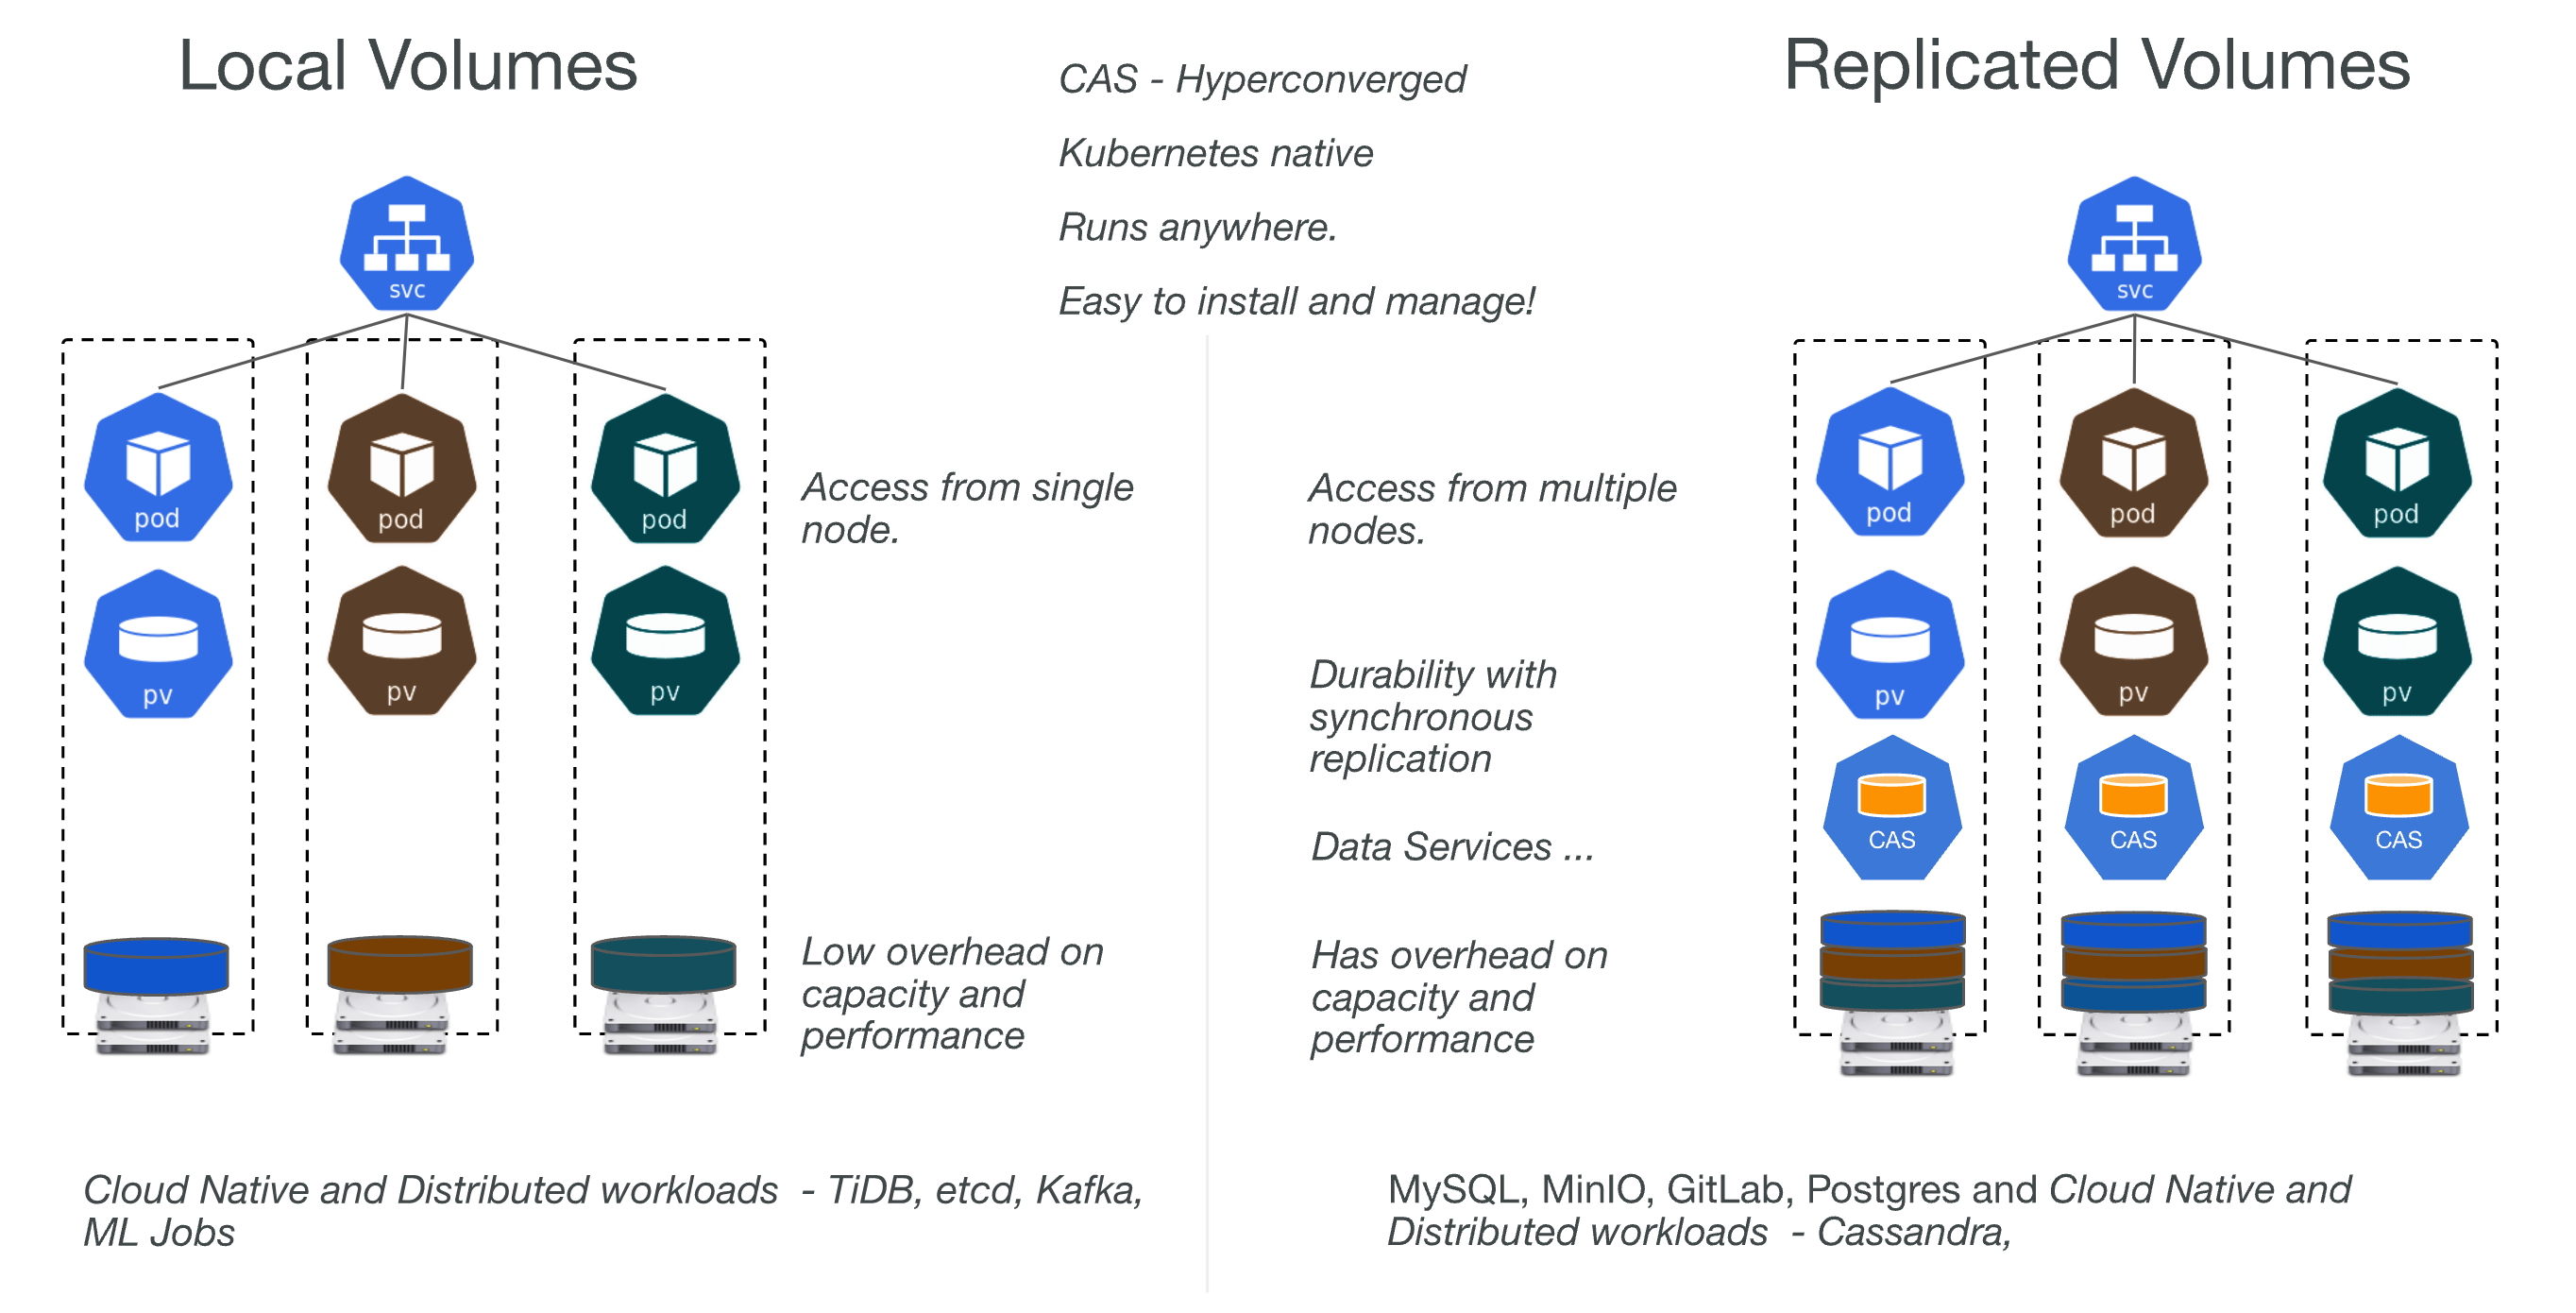
OpenEBS is a turns Kubernetes worker nodes’s available space into a highly distributed and scaleable dynamically provisioned CAS. It does this by allocating aside free space on the nodes primary or attached volumes into either local or distributed/replicated volumes available to Kubernetes for dynamic persistent volume provisioning.

References
Configuring hardware for Anthos clusters on bare metal | Anthos on bare metal | Google Cloud
Select your operating system | Anthos on bare metal | Google Cloud
Installation prerequisites overview | Anthos on bare metal | Google Cloud
Choosing deployment models | Anthos on bare metal | Google Cloud
Network requirements | Anthos on bare metal | Google Cloud
Overview of load balancers | Anthos on bare metal | Google Cloud
Creating clusters: overview | Anthos on bare metal | Google Cloud
Storage overview | Anthos on bare metal | Google Cloud